Sunday, 22 March 2015

Creating a dossier for Our Game


The first thing that I wanted to do for our game was to create a minor dossier for our team. Not only would it contain all the essentials, such as a variety of mood boards and story boards, but it would also contain a large amount of research that had been put into the game. The first thing that I put into the file was the notes that I took. Over the first week or so, me and my team had several discussions on what the game should consist of, what the enemies should look like, what the main mechanics of the game play like, etc.

The notes:


Notes taken for "team meetings" (Me)
Here are the notes in which I have been taking in our team sessions. Here is just rough ideas and feedback I have been getting from the group as a collective and how we can move on. This was a perfect starting point as we all had a etched out a rough idea of what we were doing and how we could achieve it.

The mood boards:

Mood board for spaceships (Me)
The next thing that we as a team went on to do was go and create different mood boards. I was designated with the task of creating one for the player spaceship, where as jay was given the enemy ships. By doing this for both the ships, we had inspiration and reference. This meant that if we ever got stuck for ideas or are struggling to create a certain piece, we could come back and refer to our mood boards.

Mood board for enemy spaceships (Jay)
Research:

I decided that before we started to get down with the work, we needed to have some research, something that we could also refer to. Also by doing this, I could see the key mechanics of what makes a great high score flying game. The 4 games that I ended up looking further depth was Geometry Wars, Crimson Dragon, Asteroids and War Thunder. All had great aspects to them that were much different to that of each other.

Research into successful highscore flying games (Me) 
The Story Boards:

A rough story board (Jay)

Detailed drawings (Jay)
We decided that we were going to do a mood board. This was perfect when it came to telling people what were going to do and what our story/objective was going to be. As you can see, we did two varieties. One being a version done in pencil, but stills tell the general story and concept. The other one that we did was create one that had been touched up. They both contain panels which would tell information to the reader about whats going to be happening in this part of the game. In the Photoshop mood board, it also gives a more realistic take on what it would like, merging with all the colors and sketches.

Pg 1 of detailed story board (Me)
Pg 2 of detailed story board (Me)


Pg 3 of detailed story board (Me)
Concepts:

Detailed concepts  pg 1 (George)
Here are two concepts that were made be a member of our team. He is a fantastic artist and really did manage to nail down the aspects of the ship that we, as a team, were looking for. As a team, we were all thinking that we need to look at a mix between flesh and bone and George has managed to get that on point.

Detailed concepts  pg 1 (George)

Before paint in photoshop (Me)
On the other hand, I was tasked with the player ship,  As I felt that I was not that skilled when it came to painting from free hand, I thought that it would be much better if I made the ship in Maya and then painted it over the top. It was a fairly long winded way of doing it, but looking at the end result, I can honestly say that I am extremely happy with the way it has turned out. It turned out to be a good piece of concept art.

After paint in photoshop (Me)
Starting the designs:

First designs (Jay)
Again, Jay was extremely talented when it came to working in Mudbox or Zbrush, so he set of straight away, composing a basic model of what the enemy ship could look like. Blown away by the results that he got, we, as a team, were all desperate for him to continue it on.

One sheet:

Our one sheet (Ben)
Coming back to the task that we had done earlier in the year, we were told that we needed to create a one sheet. This will tell the producers what are the basic outlines for the game and what the vision was going to be. This included the environment, the ship design and how the score system will work.

Designs for the space station:

Screenshots of designs pg 1 (Ben)
We also had some designs that Ben had been putting together on Maya. In our game, there will be a space-station floating around. This looked extremely cool, but had a high poly count. At this stage, that doesn't matter that much, but what was important is getting some designs done.

Screenshots of designs pg 1 (Ben)
I am happy with the way that the game is going so far and I can only hope that the form and the pace stay to a high standard. This was just a quick skim of what features the journal, but still, I think its safe to say that the project is going good.

The full dossier (Me)

Wednesday, 11 March 2015

Life Drawing - Lesson 12

We were told to draw 5 minute sketches, looking back at my older life drawings, my artistc skill has come on dramatically.

Another quick 5 minute sketch.

We were told to create rapid drawings, these were all 1 minute and had to fit on the same page, so size was quite an issue.

Again, continuing on with the 1 minute sketches.

We were told that we were to focus on a section of the model, using the side of the charcoal, so this mostly consisted of  shading areas to create an outline.

Its hard to see, but this was the exact same idea, but from a different posing position.

This by far, is my favorite life drawing that I have ever done. It looks incredibly realistic and the shading is perfect. We were told that we had to use a different method, so I felt stamps would be an interesting twist on the human body.

This drawing was done with a a pen that had three tips, it very much reminds me of the binary code that is present in code. Again I managed to get the shape of the body quite well, except this time, less shadows were present.


The last drawing was also using a stamp, the only problem being that it was not nearly as successful as the first stamp during that I did.

Tuesday, 10 March 2015

Frog Creature in Photoshop


In the lesson with Steve we were looking at a unique way of drawing characters. In the images that we viewed, we saw animals with the body type of humans, but still keeping key features of the body, such as the hands and face. A great example of this is the graphic novel "Maus". In this book, it tells the story of the writers  farther, who was a Jewish man in Germany during World War 2. In the novel, the Jewish  people are depicted as Mice, care free and easily in danger, where as the Germans are shown as cats, things that hunt down and kill Mice. A spot on representation of real life.

Depiction of animals with human characteristics.
Looking at these creatures, we were told that we were going to use this method to create a creature that had to be a representation of a frog. The first thing that I did was gain research and a reference. This is so that I can get the features of the creature right.I went straight onto the internet and looked up exotic frogs. These frogs were very colorful coming from such a tropical place, I needed to make sure that these colors were incorporated in my game.

Finding an image to get reference.
After I had found the picture that I wanted, I bought it into Photoshop and was ready to paint a representation of it. We were told that we could do a 3D model of the creature and then paint over the top. Now normally I would jump at this opportunity, but this time, I felt that I needed to improve my painting skills. I would use a skill that a close friend had showed me. Its when you get the picture, create a new layer and paint over the top, almost like a form of tracing.

The first thing that I wanted to do was put the outline of the creature on. By selecting the paint tool, I went around the outline so I could create myself a box to paint in. I also put my own twist on the character as I didn't want to directly copy it.

Painting over the image with an outline.
Below is an image of what the final outline looks like without any paint added to it. The reason I went with this direction is that I wanted to create a realistic interpretation with paint, something that I had never done before. Now that the outline was done, I had the chance to move on and add in the paint to the image.

The outline so far.
Moving on from the outline, I started to paint the inside of the creature. With the frog under as a template, I created a new layer and used colors from the picture to paint over the top. I first started with the eye, using the eye dropper on the template, I managed to get the color perfect, though it still didn't match up nearly as well as I thought it would. To make up for this I used the blur tool at set the strength fairly low and merged the colors. This was much better and made the creature look quite realistic.

Once I had got the eyes right, I proceeded to continue with the rest of the body, which mainly consisted of greens, except for the legs, they were mostly blue.

Adding paint into the piece.
After all the colors had been merged on the body, the next stage was to continue with the arm that I had just drawn free hand and make that look as good as the body. To be honest it mostly consisted of me doing guess work of where the color would change on the arm, similar to that of the other side. When I was finished with it, I was pleased, the result matched the other hand.

The next thing was to give this character a gun. Again, by grabbing reference off of the internet and placing it in a view where I could see it, I managed to draw a decent replica and will it with a good tone to suit the piece.

The last thing was to reduce the size of the outline to make the piece look much more realistic. As I already had it on a separate layer, all I had to do was use the lasso tool and just cut the pieces that I didn't want and I was done.
Painting the gun and stalk.
Below is what my character looked like without a background and the reference removed. So far I am extremely happy with the way that the frog has turned out so far. The next thing I wanted to do was grab a background and stick it onto the image to finish it.

The finished painting.
Going on the internet to find a decent background, I managed to come across a rain forest. This would look perfect with my piece, so I managed to slot it straight into the image and see what it looked like. Although I was happy, I still thought that it needed a bit of tweaking, so I applied several filters to it and blurred the background until I was happy with what I had.

Final design 1.

Final design 2.

Final design 3.
I managed to get 3 different results, just by changing the hue and saturation. I feel that my favorite one is number two, it just suits its environment a lot more than the others plus the color with the gun, makes it look like hes up to something, being mischievous.

If I could do it again, I would probably copy the template a lot less and add more aspects that I designed myself. Overall though, I am really happy with the results that I got and I am glad that this time, I got to practice my 3D drawing skills, rather than modelling skills.

Sunday, 8 March 2015

Unwrapping the U.Vs in Maya


Going back to our T-Rex, we were told today that we were going to be unwrapping the U.V's which meant that the creature would be ready to texture. When we were first told that we were going to be doing this I was extremely happy. Not only did it link to the game that I would be making with my team but as I only had a vague knowledge on the subject, I would like to improve my skills on this area dramatically.

We started off the project by uploading the T-Rex that we did last week. Robin had also provided us with a T-Rex already done and ready to cut just in case something went wrong with our own projects and we needed to restart, we had that back-up. We selected the T-Rex and went onto the U.V snapshot. By doing this, we had all the U.V's appear. The result is below.

A snapshot of the U.V's.
The result is very messy and you cant see exactly what you are doing. The way to fix this is that you select the object that you want to map and go to the "Edit U.V's" selection. After this, you select the Plannier mapping button. This makes all the U.V's on the snapshot appear as full image. This means that you can see what you are doing and then proceed on to cutting and unfolding the U.V's.

After plainnar mapping.
At certain points on the Tyrannosaurus Rex, we want to cut into the U.V's. By doing this, it means that we can then unfold the U.V's, which in turn makes them ready for texturing. First things first, we needed to decide what sections of the T-Rex we are going to cut. We need to think carefully about how we do it, because we could end up cutting too much of the U.V's, making it much more difficult to texture. 

I started off with the leg, so I cut a full circle around where the leg starts by using the edge selection tool and then cutting tool, This was going to be the starting point for the U.V's on the leg. The bottom point would be the ankles, not the feet themselves, as they and the toes have their own rounded parts, which would not turn out as good as it could be, if I continued with the cutting process. The next part was to create a split down the middle. This would be the point that would create the fold, where the leg will separate. I then had to select the U.V's by right clicking and selecting U.V. Next, I had to select all the U.V's in that cut. The last thing that I had to do was go to the settings and select "unfold".

Selecting the U.Vs ready to unfold.
After I had repeated this process on the rest of the creature, and had everything that I wanted unfolded, the model was ready to texture. This could be done in several different way. One of them, taking the U.V snapshot and taking it into Photoshop, adding what you want to it and then placing it back onto the creature as a material. Another way that you can do it, is take it into Mudbox and paint over the top.

The unfolded T-Rex.
I am extremely happy that I managed to achieve what I wanted today. This was something that I was quite desperate to learn and its been really good for my confidence to see all of my skills start to stick together and achieve a decent end result. I can only hope that we do more of this in the future as it was also really enjoyable. 

Tuesday, 3 March 2015

Texturing a Scene in Photoshop and Maya


In the lesson today we were told by our teacher that we were going to be texturing a ready made scene in Maya using Direct X11 shader. This was quite interesting and was something that I was really eager to learn. I had always struggled in this department and only until recently, while I have been working on my team game and with the help of team members, have I come close to overcoming this.

The first thing that we had to do was go and select the files that the teacher had given us and open it up as its own project. In this file, we had the scene that we had been set and all the textures, already for us to place onto the scene. The thing was, our teacher wanted us to do this ourselves, giving us the scenes but the textures had to be modified in our own unique way, using a variety of skills on Photoshop. The next thing was that we had to make sure that the Direct X 11 shader was in the scene, as this task was going to prove extremely difficult if we didn't have it. It was just a case of going into the project settings and making sure that it was ticked.
Importing the right assets in Maya.
The scene was fairly simple, it consisted of a barrel, a pavement, some drainpipes and a boarded up window. The way that we would go about this is that we would create a U.V snapshot of the several different objects that we would want to texture. The next thing we would do is take this snapshot into Photoshop. With the snapshot, we get to look at all the U.V's and how they work, meaning that we can place and image on top of those U.V's to make sure that that they will line up on the object perfectly.

The scene ready to texture.
In Photoshop we are presented with a set of U.V's if we select the file that we had just snapshotted. In here we could line up anything that we wanted and then make it appear on the object that we took the U.V's off of. Below the example is a barrel, we have the barrel model in the scene but its clear white. So by editing the U.V's, applying an image that I like to it and then adding adjustments, such as making it look old, its ready to put into the scene,

Adding the textures that I wanted in the scene.
We can then go back into the scene that we had made up for us and then add a material, by doing that we can then select the Direct X 11 shader and then add a file to it. The file has to be a targa, this means that the U.V's will find the ones of the object and stick to them.

Setting up the Direct X 11 shader.
Once we had the file that we had been working on selected as a material for the shader, all we had left to do was click apply and it fits onto the image perfectly. The best thing is that we can modify it adn upload the same file and it will apply the changes. The result has worked out well and is a very interesting way of texturing, the rest of the scene now had to be textured.

Applying the Direct X 11 shader.
We were also given the U.V's to the majority of the street. Again, repeating the same process that we had done previously, I grabbed a variety of textures and placed them all over this snapshot. Also by putting together all of the Photoshop skills that I had learnt this year, I managed to combine several of the textures together and create a lot of depth in the scene.

Continuing applying textures on the U.V's.
Again by looking at the same things that I had done previously, I just had to apply it as a Direct X 11 shader and it appeared straight onto the scene. I was really happy with the way that this piece of texture had turned out, If you have seen my previous blog posts, you would know that this area has been something I haven't quite tackled yet, but today has been a big step forward and can only hope that I go more in depth with this area of Maya.

The finished scene. 

Steampunk Drawing in Photoshop and Maya


We were given the task from Steve to create a object or character from the steam punk genre. This is something that quite excited me as I had always enjoyed the ideas of it, wha tit carries, its in the past but has elements of the future featuring in it.

So what is Steam punk? It is a genre of science fiction that instead of having electrical powered machines, everything is powered by steam. The main elements of the steam punk genre are set in a Victorian age, with people still set in those ideas, just with an added technology.

An example of a steam punk boat.
The plan was to be different. I wanted to do something that no one else had done, something that stands out from the others, thinking of ideas, it hit me, I was going to make a steam punk toaster. Its something that hasn't been seen before, that's means that I can be completely original with it, putting my own ideas across, with no template set.

An old Antique toaster.
The first thing that I did was look at inspiration, the main one being a Victorian early styled toaster. I wanted to get that old, vintage effect and this image was perfect with what I was going to create.

I decided that with this piece, I was going to make the model in Maya, a 3D program and then take a rendered image. After that I would take the rendered image into Photoshop and paint over the top. As it already mocks where the shadows would be, it would help me in a department where I have always struggled.

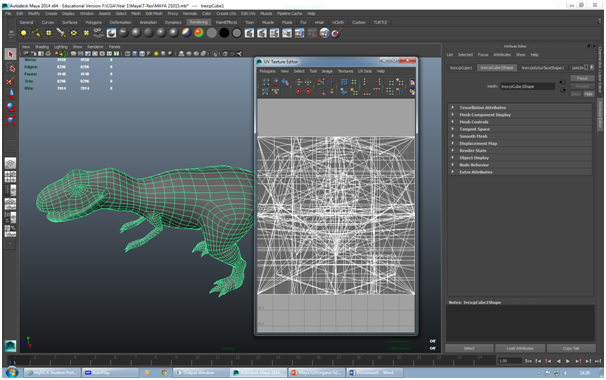
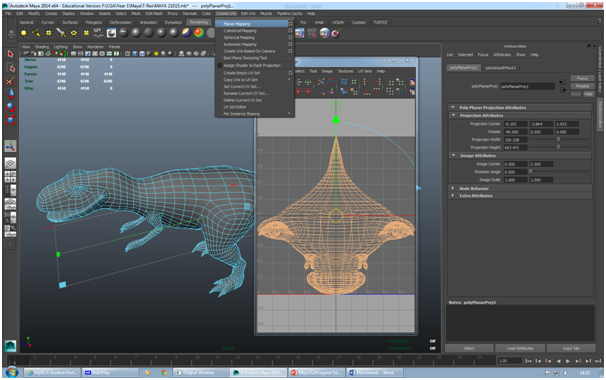
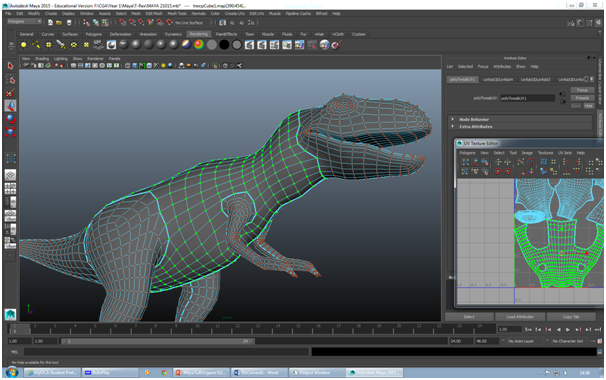
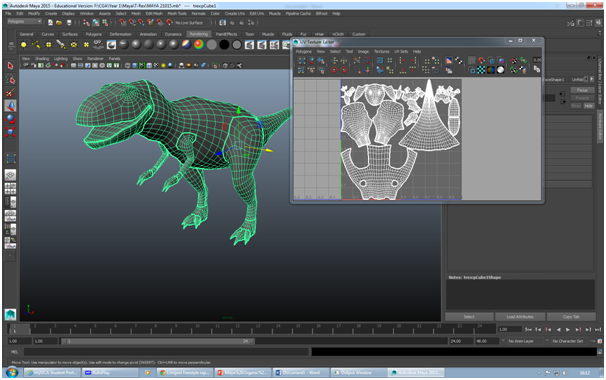
I started off with a cube and stretched it to a point where I was happy. Using a mixture of the split tool and the insert edge tool, and by moving around the vertex's on the model, I managed to a Victorian styled base. By extruding base and re-sizing it when I got the height right, and then repeating the same move for the very top, I had the basic model. On the side, Using a cylinder, I managed to make a variety of different cogs that would feature on the piece and a crank that would have to be used in conjunction with the cogs to get the toast to go in and out, while at the same time, creating a gauge for the steam.. By creating a cube, stretching it up, extruding the faces and messing around with the vertex's, I also got a great replica of toast. The last thing that I had to do on the model was add in edge loops on the side to push in the top half of the faces in a create vents all over the toaster.

I created a plain under the photo and attached a hard wood surface to help replicate a wooden table and create a sense of realism. I then added a directional light to the piece to create shadows and was ready to render the image. I set the render view in a way where I was ready to take the screenshot and where the toaster would be the main focus.

Setting up the scene.
Once I took the model into Photoshop, I was ready to add different images and paint over the top to get this a realistic looking as possible. The first thing that I did was get an image of a steam gauge off of the internet. I then used a filter to mix it up a bit and then used the warp tool to stretch it in a position where I felt sited the piece.

Adding detail.
The next thing that I went onto to do was set up the brush to have quite a low opacity on it, This meant that when I painted over the layer, I would be able to see the model through the paint, plus I would also have a template to know if I am going outside of the edges. I colored the crust of the bread a dark brown and used an already set paint brush to do a splatter effect with several different whites on the bread.

Starting to color the bread.
The next thing that had to be done was putting a base layer on toaster to get that bronze steam punk effect. I thought golden yellows and browns would be the most appropriate tone to use for the piece, so that's what I ended up doing. The cogs were colored much lighter as I wanted then to stand out alot more, just to show the detail that was put into it.

Adding a base coat to the toaster.
I then made the brush strength a lot stronger and went over the model again, but this time with much deeper colors. One thing that I needed to do was keep the paint light enough so that I could see the template that was under the paint, keeping the shadows in place as well. This part mainly consisted of me filling in the finer details and zooming to get all the nooks and crannies.

Putting the final layer to work.
Now that the toaster is at a point where I was happy with it, I was ready to add a background, using the internet, I grabbed a great photo of a kitchen and lined it up in a way that was very suiting towards my piece. I also blurred it, along with the back of my toaster, to create foreshortening in the piece. The last little thing I did was add specks of white and then blur it quite strongly. This created steam and looked quite good on the final image.

The finished design.
I was extremely happy with how this has turned out as I am not used to creating images that turn out quite realistic in Photoshop. Saying that, if there was anything else that I was going to do to this piece, it would probably be to add more detail to the model itself, perhaps more screws and other mechanics in the toaster.

At the end of the day, you can see the vision that I was aiming for and the result and I must say I am very proud with what I managed to achieve. I look forward to continuing this trend into the next image and hope the form continues.