Tuesday, 22 September 2015

Summer Project (Creating a Cyborg) - Texturing a Shotgun Shell


We had to make sure that when we presented the model, we had some evidence of us attempting to texture a model. I wanted to make sure that the thing that I was texturing was a whole model, so Phil could see what it looked like as a full model and texture.

I decided that I was going to texture the shotgun shell that was on my characters shoulder pad. This meant that I managed to get the whole texture at complete to some standard. Texturing a model is something that I have always struggled with. This past year, we haven't really focused on the subject of U.V's so this is something that i'm not looking forward to.

Preparing the Shotgun Shell for Texturing.
I started off by selecting the model that I wanted to texture, the shotgun shell. This model was fairly simple and did not have a lot of parts to it. First I decided that I needed to map it, so I selected the automatic mapping and then went to the U.V texture editor. By automatic mapping the U.V's , this meant that when it came to texturing them, they would be neat and not on top of each other. This can work with small items such as the shell, but if I was to do this with anything else, then I would cut the U.V's myself and scale them accordingly.

The U.V's in the U.V Editor. 
Inside the U.V editor, we get an image or all the U.V's and poly lined up neatly. This is because we selected them to have automatic mapping. The next thing we need to do is select the U.V snapshot so we can texture it in Photoshop and select the right settings accordingly, using the power of two to select the aspect ratio.

The U.V Snapshot.
This is the U.V snapshot that we are left with and when we open up Photoshop. The next task that we were left with, was to add the color and texture that we wanted. I created a new layer on Photoshop, painting the top part of the shell with a gold and the long barrel and end with a dark read. I then obtained a texture, which was rust and applied it over the top of the U.V's. I then made sure that the settings were on multiply, so it faded through the colors and gave it an aging effect.

The Textured Targa Page.
This was the final result that I was left. The next thing that I needed to do was to save the file as Targa. By doing this, it meant that I could apply it as a material and it wouldn't look like a set of U.V's. I went back onto Maya and applied a material to the shell, this was blinn. I then selected the Targa file that contained the U.V's that were textured. Simple as that the model was textured all the way round. If I had the time, I would continue this for the rest of the model. The last thing I wanted to do was get a render of the model, so the texture could be shown off.

A Rendered image of the Shell.
After altering the lighting to suit the render, I set the quality as high and started to do the render. I was actually pretty amazed with the result that I got with this bullet and texture, especially seeming that the idea of texturing a model is something that hasn't really appealed to me. I also like the way that the shell is shiny, seeing the rest of the table in the reflection. Next time I would leave myself a lot more time, meaning that I could texture the rest, but now that I have had a go, it was alot easy than I seem to remember it.

I look forward to starting the new year, especially now that I have got a grip on how to apply the textures and what the U.V's do.

Monday, 21 September 2015

Summer Project (Creating a Cyborg) - Backstory of the Character


For the character, we have to create a backstory, as to why the character has cybernetics and its origins.

This person goes by the name of Labon(which is Latin for Labour). Original scowering the Post Apocalyptic wasteland that used to be Japan, Labon had picked up many different injuries during her journeys.

Being raised by a single parent was tough, with her father being the only person in her life, her provider, her healer, her everything, that when he disappeared one day, she was completely dependent on him. This meant that she had to learn the hard way.

It was several months before she came in contact with anyone and those months had not been kind to her. It was a trial by fire, in which she was thrown into the deep end. Her first thought before even thinking about looking for her dad was survival. She had no food, no water, everything was gone along with her father, she needed supplies. Hunting and gathering was her only option, so off into the new world she descended.

Things were going well, she started to understand the ways of the hunter, taking only what she needed and also discovered an untouched forest, the fruit was plentiful. One day, she had a particularly good morning, two ravens and a rabbit, then came the beast. It could smell the blood of the hunt. Within a flash it took Labon's right hand and leg. Squealing in pain and in utter confusion to the events that had unfolded and the blood loss, she was expecting the end. But that wasn't her time, the beast fled and a dark figure picked Labon up before she blacked out.

Waking up on a operation table, the dark figure bounced up from the corner of the room to great her, she was more than lucky that day, a hunter of a scavenger community had found her and scared away the beast, though her two right limbs were taken from her.

This community had contained several highly intelligent cybernetic engineers who were keen to put their old skills to work and set to work. after many grueling hours of surgery, these implants were attached to her body. After surviving the surgery, It took several months for Labon to get used to her new implants, it was like learning how to walk all over again. Though she made sure that she contributed to the community, earning her place.

She still thinks about her father and thoughts often come into her head about going after him, though her desire to survive keeps these thoughts at bay.

A Menacing Look.

Summer Project (Creating a Cyborg) - Creating the final model


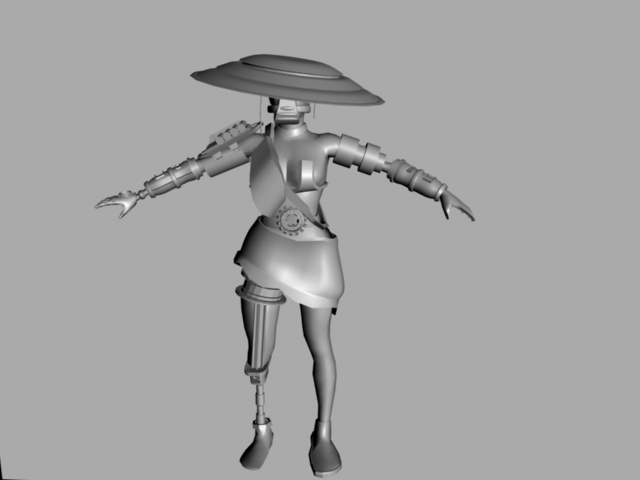
I decided that with my final character I was going to use a combination of many different ideas that I had got from my concept stage. There are many different things from the concepts that I took and then I collaborated them together to get a final result.

I really liked the way that the female character came out at the concept stage, so I really wanted to have this character incorporated into the design. I also thought that the idea of like a Japanese element to the design, so this was also going to be included in the final.

Front View of my Model.
I also had to add in the cyborg element into the character. The problem with concept designs was that they did not have enough cybernetics on the characters, so throughout this model, I have tried to add as many parts to the character as possible. This is something that helps me achieve the brief.

Side View of my Model.
As you can see on the model, the right arm and leg are complete cybernetics, with minimal flesh present on those characters features. Looking back at inspiration, I felt that the cybernetics need to be different compared to the body parts and not blend in.

Back View of my Model.
The hardest part of the character was to achieve a realistic looking body and make it seem as if the cybernetics were actually connected to the body. It was good though to come back to Maya after such a long period out. I have learnt a lot coming back to this program and doing the project and am looking forward to using it again. For a first attempt at coming back, I'm fairly pleased with the way that it has gone/going so far, but there are quite a few things I need learn. I also need to make sure that I have the right version as at the moment I'm currently running on Maya 2013.

Friday, 11 September 2015

Summer Project (Creating a Cyborg) - Concept Stage


The aim of the project was to create a cyborg character based on everything that we had learned this year. The first thing that we had to do was to go through the concept stage of creating several different ideas and picking out the aspects that we liked the most. I started of this stage by creating six different silhouettes. We had learnt about silhouettes a while  ago and was keen to improve upon what I felt was a nightmare.

I started off by doing some research, looking into key cyborgs and seeing what are their main characteristics.

The definition of a cyborg is a cyber organism, which creates a combination of the word. The idea is that it is a being that has parts electrical parts that do not belong to it helping the character in some aspect. I decided that I would find and draw some famous examples to prepare for the project.

"Cyborg"
Cyborg is a character that appears in the "Teen Titians" comic book and show. He is widely admired by comic book fans. Noticing his appearance is key when developing a decent looking cyborg. All of the abnormalities on his body all look very similar and work well as its separates the character from the implants that are helping him.

'Darth Vader'
Another famous Cyborg is Darth Vader. He is a character widely known in the Star Wars universe as being the main antagonist. Although he has not many features on the outside of the character which make you believe he is a cyborg, its the inside where he has many robotic replicas to help him.


Once I had the silhouettes drawn the next plan was to adding different shades of grey in order to get an idea of what the character will look like. These are the results that I came up with.

Three characters in one image.

A Zombie Cyborg.
I first started off with a zombie styled cyborg, I gave the silhouette big arms and this was the pose that i felt most comfortable with. I was really happy with the muscles ripping effect that I got on the skin and would defiantly use this technique more often. This leans more to the direction of us being a slave to technology, we wont go without it.

A CCTV Cyborg.
I was massively inspired by the street artist Banksy for this piece. I have also been under the notion that we were one nation under CCTV, so what happens when you run out of space to put cameras? you put them in people.

A Dancing Cyborg.
Here I wanted to use what I had learnt in life drawing and apply to a character. I started to draw the female figure and really liked the way that it was coming out, so I continued to draw until I had reached the legs. I was particularly happy with how the face had come out, as that was something that had always plagued me.

Another Three Characters in a second image.

A Samurai Cyborg.
Another thing that I had struggled with was fabrics on a character, so I thought that I would get some practice in and designed this character. I really liked the idea of steam punk Japan, much like that of the T.V show Samurai Jack. In the end this character came out very well. You can already see the improvement I have from the first picture, to this picture.
A Ceremonial Cyborg.
 Still on the idea of a Steam Punk Japan, I tried to draw a new character. With this one though, I tried to go with a more armored idea, plus his cybernetics are more visible than that of the previous character. I'm quite proud of this piece because of the amount of detail that has gone in.
A Post-Apocalyptic Cyborg.
My last character that I drew was a Post-Apocalyptic Cyborg. I wanted to practice with coats, something that I wasn't particularly great at, but I must say, the end result was something I have never done before. So Far during this task, my skills in drawing, have come a far way. I f I can just continue to keep this mentality, Then I'm sure that the final design will be a great one.

I now need to choose a design that I'm happy with and begin to model it in Maya.

Final ScreenShot of Our Game


Wednesday, 25 March 2015

Adding a Highscore System to Our Game


This scorescript gives you a score when you kill the enemy.
For the brief we were told that the game had to have a high score element to it, So we wanted to give the player a sense of achievement. I put in a piece of code so that once you had killed the enemy, it would change the highscore, This is just to put it in place, so the high score doesn't actually change at this very moment.

The game manager holds the scorescript, the pauser and the levelload script.
I had created a game manager, which holds the in-game scripts, which menas that they will work throughout the game, when the trigger is activated. These scripts here mean that you can pause the game, it loads the level of the game and changes the high score.


This makes the highscore change when you do better than the previous player.
I then added in the HighScoreScript. the score will now change, depending on what you kill and will also change on the main menu. We decided in the end to give 100 points to the player for each kill that they managed to achieve. I felt that this was fair because if it was 10, the total will be too low for the player to feel a sense of achievement when they played the game.

The score has changed when I did better.
As shown above the score on the High Score menu has changed when I achieved better. If I had more time I would defiantly go in and add in player prefabs so that the score would save.


Adding Music to Our Game


This is how we put music into our game.

I went onto YouTube to gather some Music.
For our game we wanted to have music to add to the atmosphere that you get when you are playing it. We originally wanted to get a composer from a partner university to create some music for us, so everything in the game would be original. Unfortunately this didn't happen in the end, and we had gather files off of Youtube to put in our game, We acknowledged third party content.


I then created a code to add the music into the game once its playing.
Once we had the files that we wanted, I created a piece of code that would start playing the music as soon as you were in game. It is also set so that when you are in the menu, the music will loop, so it wont cut out at any time. This is also in game.

The Music is being played.
The music is set as 2-D, This means that when you play, the volume of the sound is consistent, If it were 3-D the sound will change depending on where you were in the game. These apply more to sound effects, like bullets whizzing past.