Sunday, 17 April 2016

Games Production - The Construction and the Mapping of the First Person Gun


As I was one of the two environment artists, I was tasked with creating the gun and the props for the game. Rastislav Smolen is our prop concept artist. This meant that I would be working with him extremely closely, getting concepts off of him and altering them when need be.

The first task that was set to the both of us, was to create the gun that would present in the game, this would always be in the players view, so it had to have an interesting shape to it. Rastislav originally had come up with a fair few concepts, this included a shotgun and another variety for the machine gun. We decided that we would also have to look at the environment art that Razvan Prajanu had constructed to make sure that the gun would fit in to the environment.

Rastislav's Concept to follow. 
This is the concept that Rastislav had for the final gun. I was really happy with the plan he had given me, it was clear enough to follow, it also meant that the base would remain pretty much the same. There were some adjustments that needed to be made on the gun, not only to add detail, but to make sure the gun worked.

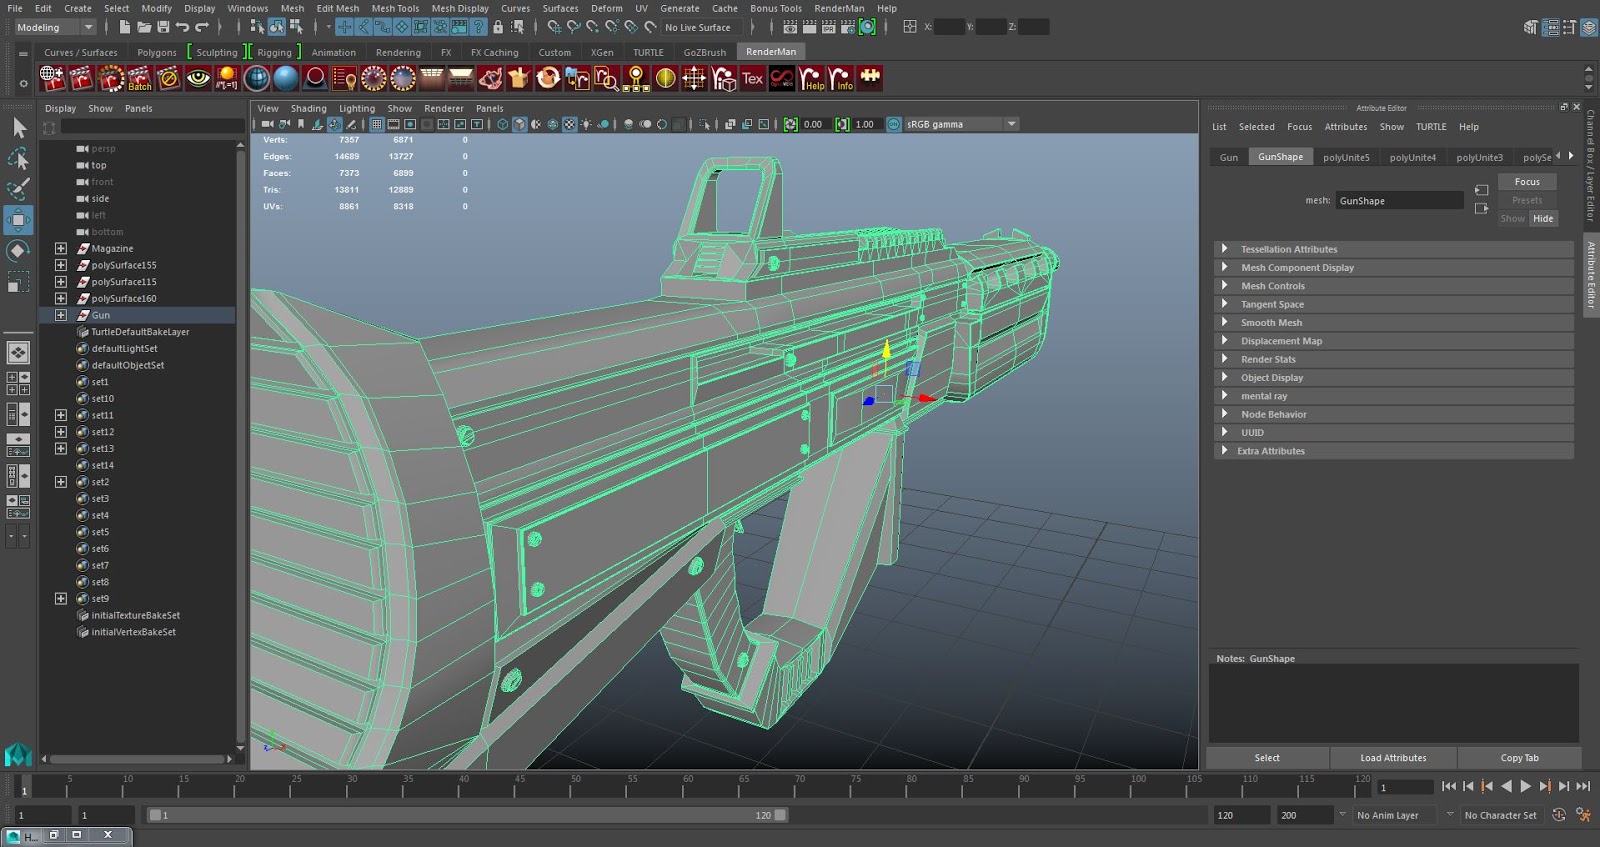
The gun has been spilt into sections, this makes it easy for me to U.V map it when it comes to it. Firstly you have the main base of the gun, this includes the grip and the handles. The changes that have been made here are that the grip has further detailing on it, with the addition of holes so that the steam can escape. On the other side of the gun, we all felt that a pin needed to be added, for animation purposes and for the gun to seem more realistic, so on the body of the gun, a gap for the pin needed to be included. Above the main body is the sight, where I have added the ridges past the scope. This again, was to give the gun a more unique feel, with it still fitting in with the environment. To the back of the main body is the Stock of the gun. There is not much change to this part of the concept, except with the addition of the soft back for the shoulder to add comfort to the gun. The Barrel at the front of the gun originally had grating in it. It would follow the concept that Rastislav had put up, but as we where limited on the tri count, so as a team, we decided that it would be best to remove this part and add a a straight barrel.
12889 Tri's for the base of Gun.
The final Tri count for the main part of the gun was 12889. This was a decent amount, as we had divided the tri's between the 3D artists and this was no way near the total that we were expecting it to be. This was due to me retopologizing the model and adding triangles into the sections that weren't going to be animated. At first, I was unsure on this process, but then my tutor reassured me that doing it will contributed towards our project.

The Addition of the Pin.
As I had divided the parts of the gun into different sections, U.V mapping the gun wasn't too hard to do. The reason why the gun needed to be mapped is so that when we apply a texture to it, it will not look blurry and will fit in well. This wasnt an extremely long process, but out of all the parts of the gun, the main body was defiantly the longest. I wanted to make sure that on the gun, the seams didn't appear on the left side. This was the side that was in constant view of the player and the seams would drastically affect how the players see the game.

The Gun Base Mapped.
One of the things that needed to be created separately was the magazine of the gun. This was because the magazine is going to be animated in the game. The magazine will be taken out by the character when they reload and a new one will be placed in the gun. As this was a fairly small aspect of the game, the magazine tri count had to low. It was also retopologized, with a few triangles added to the magazine for it to keep its shape. If I were to do this again, I would make this just a plain cube and use the normals, this will drastically reduce the polys, but as we have plenty to spare due to the low poly gun, then for the moment, this is OK.

246 Tri's for the Magazine.
As this was an extremely small asset, it was very easy to map. All I needed to do was cut it along the bottom and split the 4 section of the square. Then using the unfold tool, I could brush the U.V's and have them looking perfect. Again, this was an easy process and meant that it was now ready to send to Quixel to attach a texture to it.

The Magazine Mapped.
The last section of the gun was the pin, this was two separate meshes that were combined. The first mesh was the leaver of the pin, this was created using a torus and then stretching it along. I then got a flat cube and combined the two. The stretched cube will retract every time the gun has been fired. This will then be pulled back by the characters arms when reloading the gun. This was a later addition to the gun, as this wasnt present in the concept. Our team had decided that a pin would be required, so I constructed it and try to make it as low poly as possible. 

The pin of the gun is 676 tri's in total. This is mainly from the leaver. There is a reason for this, as when the character reloads the gun, This is the first thing that you see. Though it still is a vast amount wasted on such a small object. If I were to do this next time, I would defiantly reduce the amount, using the maps to help me here.

676 Tri's for the Pin.
The again, was extremely simple to map, as sit was two separate meshes and required very little effort in figuring out where to cut the U.V's. Once everything had been mapped, I selected all the meshes and then went into the U.V editor. Here I selected the button "Layout". This meant that all the meshes U.V's I had selected fit in coordination with each other. This has saved us texture maps, as we can texture multiple assets, with this method of texturing. Once I had all the Meshes selected and laid out, I took a U.V snapshot of the U.V map. This was created so that I could make a colour ID map. By creating a colour ID map, Quixel will recognise what part of the map needs texturing.      

The Pin Mapped. 
Below is the U.V snapshot that I created. By putting it into Photoshop, I can manually add what texture I want to go where. As you can see, the U.V snapshot gives us an outline of where the lines of the mesh. This is fantastic if you are going through the manual process that I am going through. It means that I can choose exactly where the texture is going to start and end.

U.V snapshot ready to colour for Quixel.
The picture below is the manual Colour map that I had constructed using the U.V snapshot from Maya and Photoshop. I have had to use a variety of colours so that when it comes to putting the gun into Quixel, there are many textures that will feature on the gun. The core part of the gun is a dark blue. Once this is Quixel, The Blue will be identified and a dark, perhaps black gun metal will be attached to it.

The Colour ID Map ready for Quixel.
I decided that I wanted to get some interesting renders for the gun. This was for two of our concept artists. One was for the character artist, Steve Welch, who wanted to create images of the players character and a comic book to come along with the game. I gave him one of my renders, in which he used as template and painted over the top. I was also asked for a render of the gun by Razvan, who was constructing the HUD for our game. The idea was that the gun was going to appear in the bottom corner next to the ammo count. He wanted to make it fairly transparent, so it doesn't distract the player, but makes them away of what the gun looks like from the front.

The Final Gun (Barrel later removed to save poly's).


The Final Gun.
Render from Behind.

Render from in front.


Where the Gun will be Positioned in Game.

Gun with Detachable Magazine for animation.
The object was now ready to be extracted and placed into Quixel. Everything had also been mapped, so now it was time to take the mesh with us. To do this and making sure it was easy to handle in Unity, the game engine that we were using, I had to centre the mesh. I had to select the option "Absolute Transform" and centre the pivot. In the boxes next to the absolute transform, that are labelled X, Y and Z, I entered 0,0 and 0. This took the mesh back to the centre of the scene. I then extracted the models, with the magazine and pin (not combined) as an OBJ. By centring the mesh, It makes it easier for George Burchmore, our Game Designer, to control the model in Unity.

Games Production - Researching Abandoned Facilities


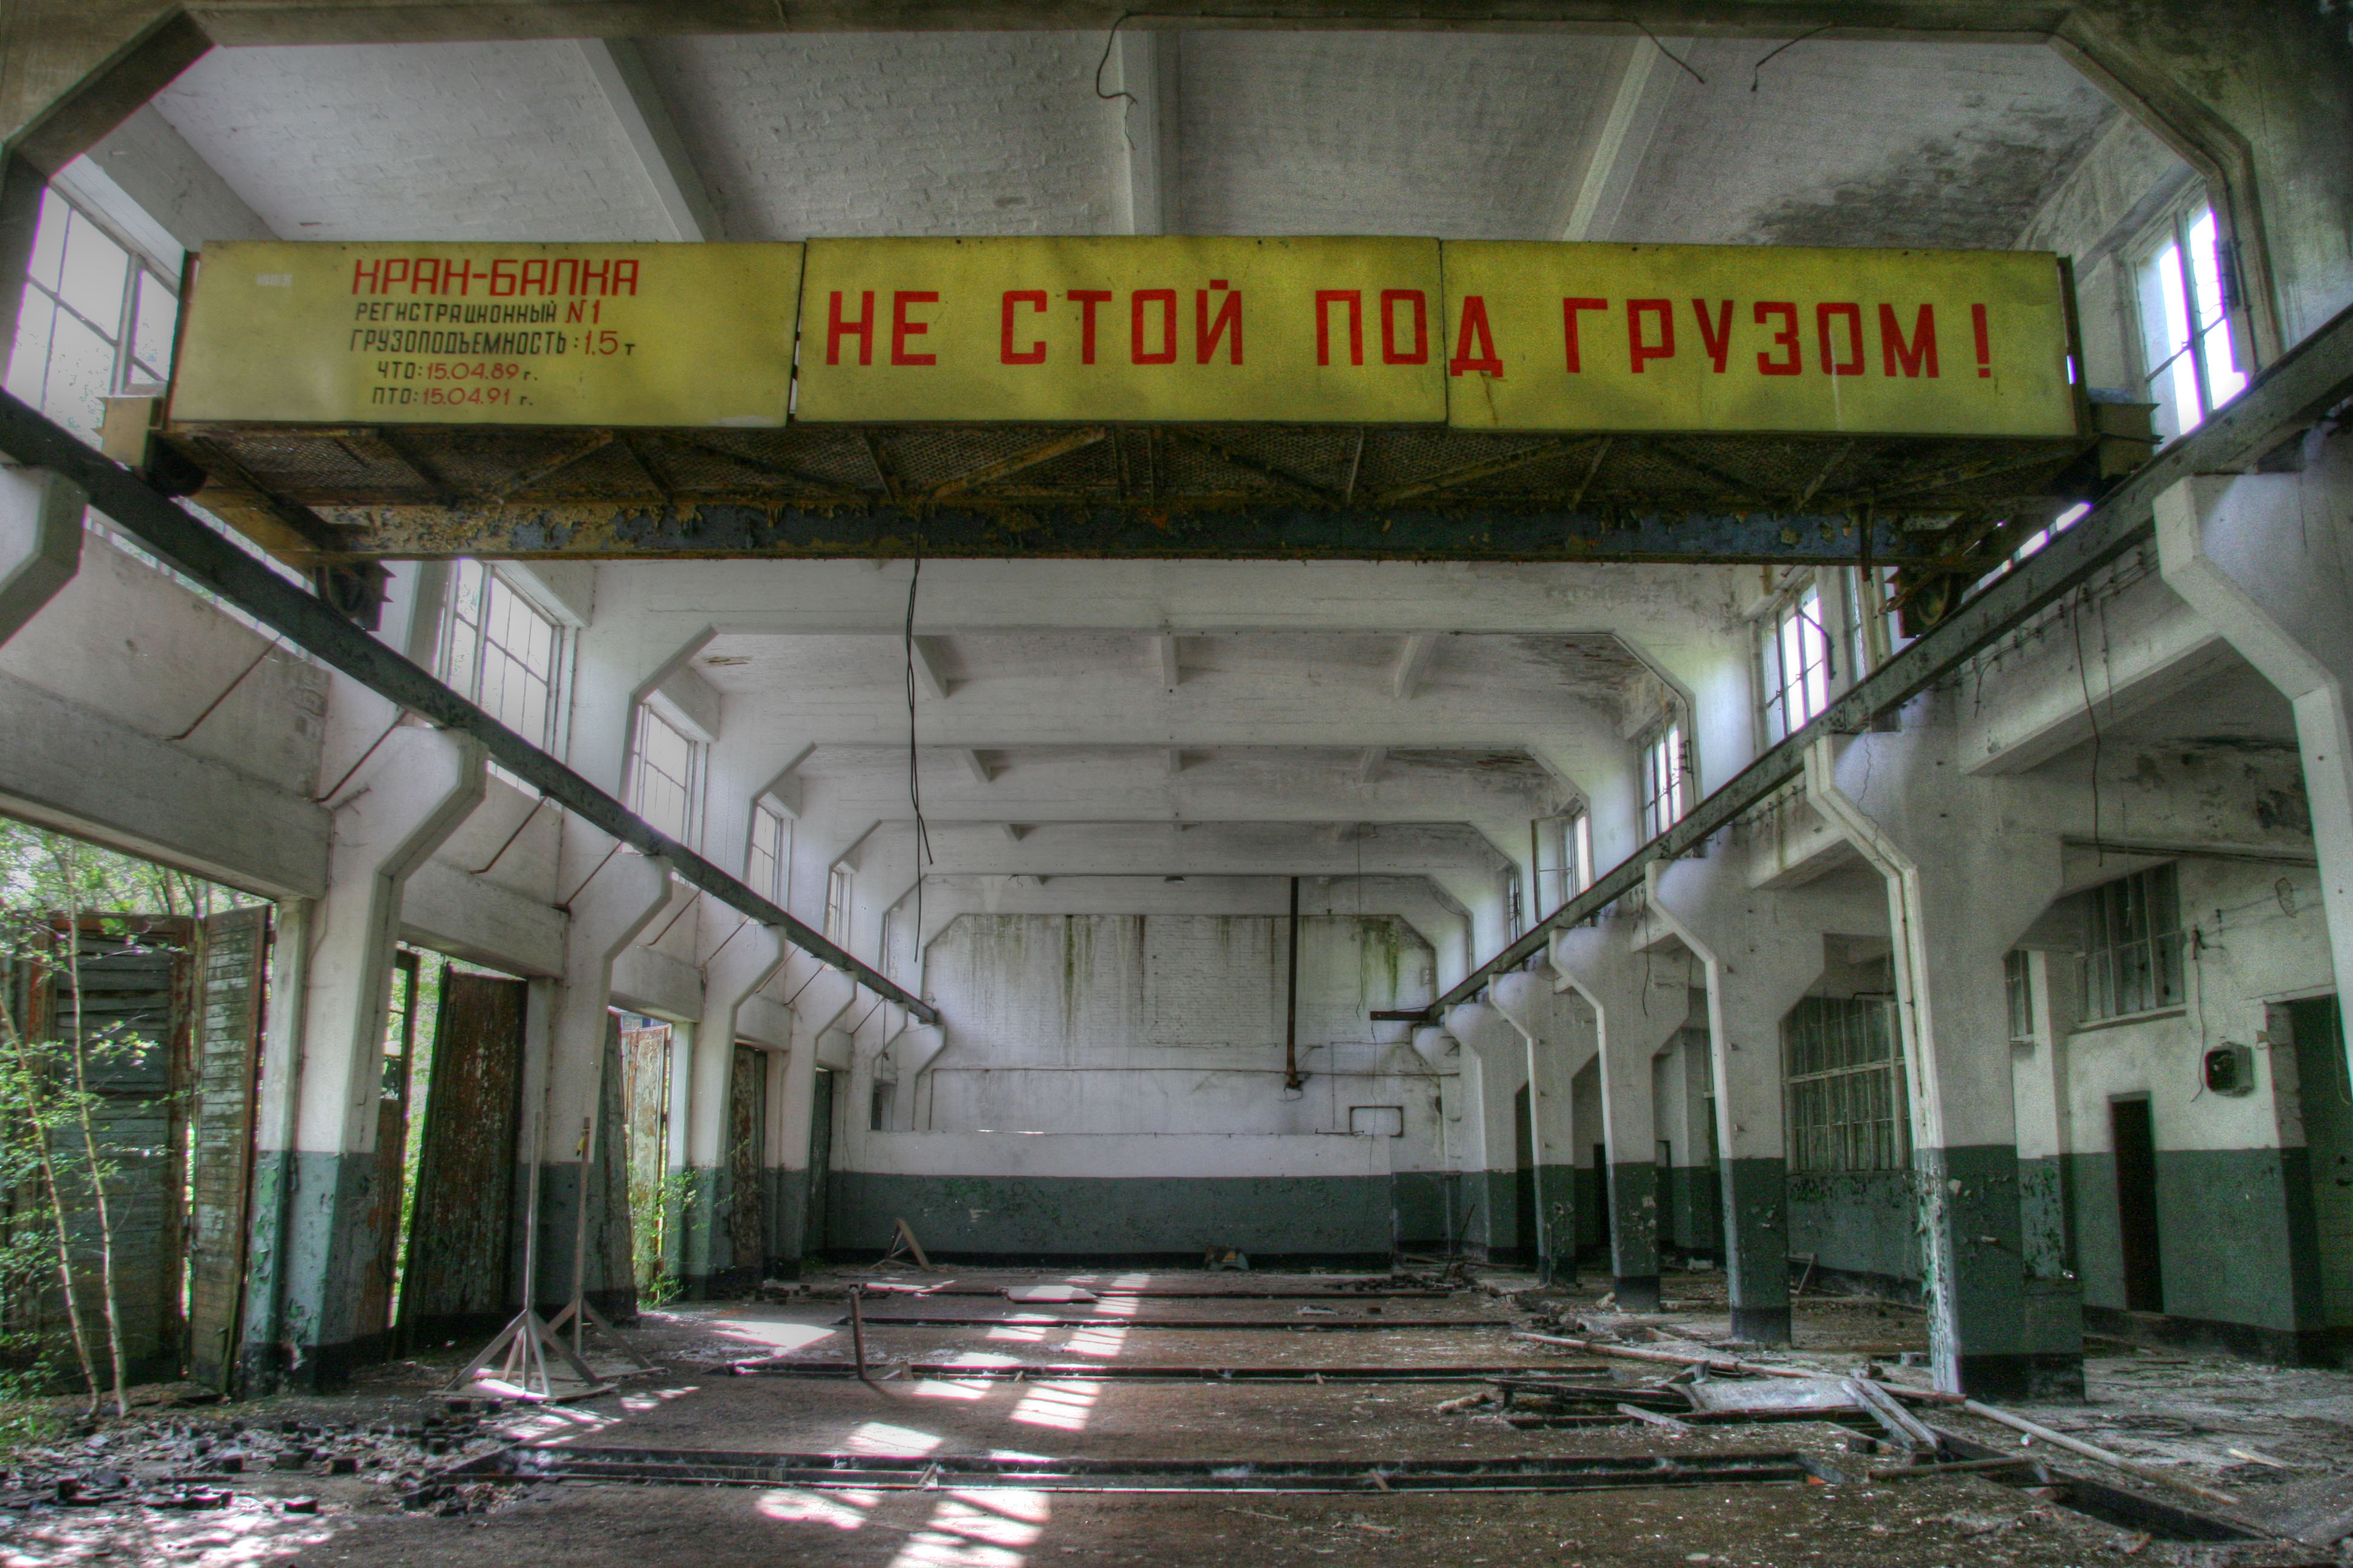
We were sent off by the game designer to gather research for the game. As the idea was that your character was suppose to navigate their way around a research and development facility, I decided to go away and look at what abandonment does to buildings. This was a great piece of research, especially with me being one of the environment artist. It gives me a sense of what the rooms should look like and what the player should experience as they navigate their way around the map.

A real life Abandoned Laboratory.
An Abandoned Barracks in Berlin. 

As we had many different rooms to feature in the level, there was a huge variety in which I had to look at. Not all the rooms look the same, the time has taken its toll on these rooms. One thing we had all decided on is that the rooms have only just been abandoned, with your character being a first response to the attack. This means, unlike some of these rooms, there will be no plant life growing or rust starting to attack the machinery. 

One thing that is common in all of these pictures, is that a story is being told in every aspect of the rooms. You can evidently see something has placed items there and left them to rot, on no fault of their own. If we are to create a realistic experience with this game, then we need to think outside of the box when it comes to placing the assets, not just randomly placing objects hoping that it works. 


A mood-board of Abandoned facilities.
I finally decided to finish this part of the research by creating a mood board which looked at many different rooms, whether in an actual video game, or in real life, that had been abandoned. This is so that I could get an idea of what the effect abandonment had on our facility. One thing that is a common occurrence is the use of light so that the player has a way point to follow. Also many dark tones have been used. Staying away from the regular bright shades that many clean facilities have.

This has been a great process as I now have an idea of what the game will look like. It has also given me an idea of what makes all these images so captivating and how we can incorporate into the environment.  Also if we want to save on tri's, a modular environment needs to be constructed and in the abandoned space station images, we would have to construct one piece of a wall and then repeat over to construct our environment. 

Games Production - Game Design Document (1st version)


We were told that we would have to construct a game design document for the game. This would outline what we plan to do with the game and what inspiration we can draw on. The game design document is also essential as it gives us a plan to follow, something that we can stick to or refer back to, if we ever get lost on the project and fall off the path. In this Game Design Document, we are aiming to set out the main premise for our game and this document will act as a template for us to follow.

Example of the game design document (The X, The 4 Pillars, Story).
It was decided that I would write the first Version of the game design document, then our Game Designer, will pick it up and adjust it. This is so that our Game Designer can focus in these first few weeks to get the game going, so that the rest of the team can proceed when it comes round to him constructing the paperwork. There are many aspects to the game design document that have to be included. Below is a section of what is included in the game design document that I constructed.

-Content
-Scope
-Conventions
-The X
-The 4 Pillars
-Story 
-Art Direction 
-System Requirements
-Software
-SDKS 
-The Player/Core Mechanics 
-Controls, World 
-Landscape
-Objects 
-NPCS 
-Sound
-Game Flow 
-The Player
-Setting
-Game Structure  
-Action 
-Objective
-Graphics
-HUD
-Limitations
-Intro
-Menu System
-The Team
-References


System requirements, Software, SDKS.
Update - As the game has now changed from a story based level to a wave based, many aspects of the game design document need to be changed. This includes the "The World" and "Landscape". These are issues that need to be dealt with, as if we fall off track, we cannot follow this document as its a different type of game. When possible, it needs to be updated. Some elements can be kept, where as others cannot.


Games Production - Researching into other First Person Shooters


We, as a team had decided before the project started, back in the Christmas period, that we wanted to create a first person shooter. This was going be an extremely difficult task and would require a lot of work, but the perks out-way the risks in this case and decided that a challenge for the team would be best. This time around, we have a fairly large team, consisting of 7 members. There are 3 Concept artists (one environment, one character and one prop), 2 Environment artists, 1 Character artist and 1 Game designer.

I felt that before the project, one of the best things we could do is market research. This was looking into other games out there, primary First Person Shooters, seeing what feel we want the game to have, how we could make it fun and what our game unique.

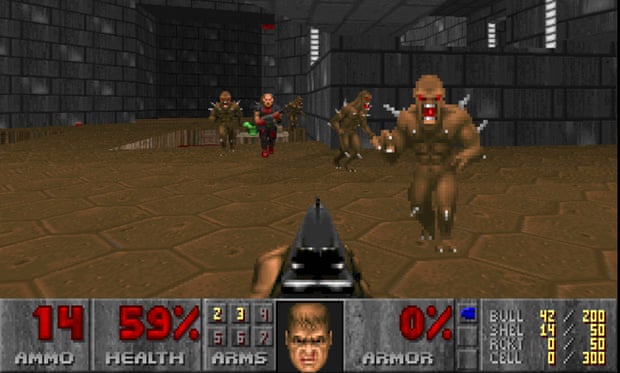
After talking to the team, we all decided that we wanted the game to have a retro feel behind it. It had to be fast paced, where the player is constantly is on the run, enemies are less an obstacle, where the player takes their time to defeat them, more, rushing through them. One game in particular a certain member of the team referred us to, was the original doom. This was one of the first games to have the player fight enemies from the characters eyes, at the time, fully immersing them in the game. There's many things that the game does right, which we want to include, such as the pace of the game and the level design. To make our game original, there are aspects that we wish to avoid. One such is the placement of the gun. Times have moved on to incorporate a realistic feel, like you are actually looking through the characters eyes, so instead of having the gun in the middle of the screen, it will be placed on the right. We have also decided that we are going fro a 3D game, where as compared to Doom, which has 2D sprites as its enemies.

DOOM (a godfather of the First Person Shooter).
A game in particular, which caught our Game Designers eye, was the recently released game, Wolfenstein: The New Order. This is a modern game that manages to retain the feel of a retro styled game, but convert it to a modern audience. It is a remake of the classic Wolfenstein game series and manages to feel like a fast paced game, while including many themes from the original. As we are creating a 3D game, this is a good inspiration. We have many stretch goals, one being the inclusion of other guns, but if we do not reach that target, the gun that the character starts with needs to feel fun enough so that the player doesn't become bored.

Wolfenstein-The New Order
Another timed game that interests us is Quake. This is very similar to Wolfenstein and Doom, as it includes elements, such as pick-ups and and fast paced action. Again, this is a game we need to look towards as inspiration. The pick ups will be something that needs to be included in the game. It keeps the player running, instead of letting them camp in a corner until all of the enemies are defeated. They have to push themselves and take risks in order to succeed in the game.

Quake's Health Pick-ups.

Update - Due to a team decision, we have decided that in the time frame, we are no longer going to construct a level, but will now create a wave based game. It means that we can save on the tri count, the map limit and make the game run better. This is a great idea as our main issue is performance and the limitations that we are restricted to. The way that we will get around the tri limit will be to make the individual assets, such as the walls, pipes, etc and then put them into unity and duplicate them in unity. We have been told, because it is the same asset, it does not count as any tries towards our tri limit. This gives us a bit of breathing room towards the limitations.


Wednesday, 23 March 2016

3-D Art - The Final Clip (Survivors Search)


I was really happy with the end result. I called it survivors search as the animation is of the camera searching through the scene, desperately trying to find something, with a zombie attack, just taken place. The lighting has come out fantastically as I had decided to bake it and the sounds going on in the background help create a lot of atmosphere.

I felt that I put a lot of effort into the project and really did see the rewards, as I had said from the start, I would rather have quality over Quantity and this really did help the project. If I were to do it again, I would try and experiment with the engine that I used. Instead of playing it safe and going into Unity, I will try Unreal and see what affect that it has on the quality of the project.


Screenshot from "Survivors Search"

Thursday, 18 February 2016

3-D Art - Constructing the Scene in Unity


Here are just a few adjustments that I had made to the scene to help create atmosphere, this include the addition of animating the camera, adjusting and baking the light and adding sound:


Addition of animation in the scene 

Adding Sound into the scene.

The camera walks around the scene.

The objects need to be static.

3-D Art - Creating Prefabs in Unity

Create a prefab through an empty game object.

Prefab in the project.

The Prefab in Unity.