Wednesday, 23 March 2016

3-D Art - The Final Clip (Survivors Search)


I was really happy with the end result. I called it survivors search as the animation is of the camera searching through the scene, desperately trying to find something, with a zombie attack, just taken place. The lighting has come out fantastically as I had decided to bake it and the sounds going on in the background help create a lot of atmosphere.

I felt that I put a lot of effort into the project and really did see the rewards, as I had said from the start, I would rather have quality over Quantity and this really did help the project. If I were to do it again, I would try and experiment with the engine that I used. Instead of playing it safe and going into Unity, I will try Unreal and see what affect that it has on the quality of the project.


Screenshot from "Survivors Search"

Thursday, 18 February 2016

3-D Art - Constructing the Scene in Unity


Here are just a few adjustments that I had made to the scene to help create atmosphere, this include the addition of animating the camera, adjusting and baking the light and adding sound:


Addition of animation in the scene 

Adding Sound into the scene.

The camera walks around the scene.

The objects need to be static.

3-D Art - Creating Prefabs in Unity

Create a prefab through an empty game object.

Prefab in the project.

The Prefab in Unity.


3-D Art - Texturing Using Quixel


The process of taking an object through Quixel.


A Shotgun textured

The Tarpooling

A photoframe of me and my friends.

The Blinds

"Sains" cream of chicken soup

The Broken chair 

A tin of tuna 

A case of shotgun shells


3-D Art - Mapping the Assets for the Room


The next stage was to map the assets, This was important as the textures need to look right if they are going to go into the engine and perfect mapping is the solution. I decided that the first thing to do was to map these different objects.

Mapping the assets
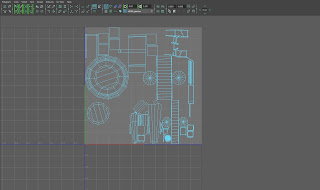
To create materials that would suit all the models, I decided that it would be best to but many different textures on one map, this will be cheaper on the engine and will make it run better.


Grouping the assets.


A U.V sheet with multiple objects.


The whole scene mapped.


3-D Art - Constructing the Assets for the Room


I made all of the models in Maya, which was something that I was completely familiar with. The whole idea behind this project was that I was to construct many different models as possible so that it could fill the room. However, I didn't want to fill it with low poly, low resolution models. The models have to look like a game assets and help add to the atmosphere. This is a case where the quality is defiantly over the quantity. I would rather have a room with a small amount of realistic looking assets in it, compared to populated room, with unrealistic models.

Pictured on this blog post, are a variety of the models that I had created for the room, as putting up every single model that would appear would make the post seem very tedious. A way that I worked around this is that I put all the models that I had create, with the room and set the scene up. This gave me a sense of what the final product will look.

Below are a selection of models that I have created in the scene and have rendered using the program "Render man". As you can see, I have put a lot of detail into the models, wanting to get them to look like actual game assets.


Blinds.

Shotgun and Door.
Below, as mentioned before, I decided that the best course of action was to create a scene that had all of the assets that I had created in the areas where I wish them to be in the scene. I am extremely happy with the way that the renders have come out and hope that when it comes to putting them into engine, It looks like this.


The Room

Shot of the T.V

From the corridor.

Out of the window.

I created a variety of assets and unfortunately could nit put a picture of every single model, so below, I constructed a list of what is going to feature in the game.

The List of assets that I created:
-sofa
-tv
-speaker
-chair x2
-can x3
-door x2
-lamp
-tarpooling
-footstoll
-box x3
-cabanit x2
-blinds x2
-bench
-Water bottles
-books x4


I am happy but I need to move onto the next stage. It may look good as a graybox but I need to add textures to it, map the objects properly and make them look good in engine. As I have a large amount to map, I need to  start on them as soon as possible.

3-D Art - Constructing, Mapping and Texturing a Pot (Test)


I wanted to run through a quick process of how I will construct, map and texture the assets that will set the scene. By doing this, I could get to grips with the process, meaning that I can spend less time on trying to go through the process if I already know it.  

I decided that I would construct a small pot, which if constructed properly, it can go into the scene. It was only something quick which didn't take a lot of effort to construct. I created a cylinder which I slowly expanded over time by pulling the edges out. Then it was ready to map.

The pot created in Maya and mapped.
Mapping is one thing that I really did struggle with over the course over last year. So this was my chance to learn the process properly, as I was going to construct many assets, the use of mapping is going to be extremely important. This is a great opportunity for me to try and hone the process, by constantly repeating it until the U.V's look clean. 

Here I simple cut the edges of the pot and used a cylinder unwrap on the main body. This gave me a great U.V map, after adjusting the other maps. The reason for good U.V's is so that when it is ready to textures, they apply the material to where you set them, and at that size. Bad U.V's means we could end up with a strange looking material in the scene.

The U.V's are in Place.
Now that it is mapped, all we have to do is extract the model as an OBJ so that we can use it in Quixel. We can now apply a base material to the model and see if the U.V process has been sucessful.

Constructing Maps in Quixel.

Placing a Texture in Quixel.
I decided that best thing to do was to apply a porcelain texture to the model. The best thing about Quixel is that I can simply select the mesh and because of how the U.V's have been laid out, the texture that it generated has wrapped itself around the model. 

In doing this, Quixel generates four maps which can be plugged into game engines. These maps are the "Albeado", "Gloss", "Specular" and "Normals". These are required in creating realistic looking textures.

In Unreal Engine.
I felt that the best thing for me to do was to take renders of the model with the texture on. This is built into Quixel, which gives me the opportunity to view the texture and sample it. This is great as I can see if the texture suits the model or not and correct if I see fit.

The Normal's created by the smart material.

A Screenshot of the Test.
This took several attempts to get this map looking right, but this was well worth the trouble. Not only have I gone through the process which I would partake throughout the project, but I also have gotten used to the idea of creating "Good" U.V's. This is something that has bothered me in recent times, but I am starting to warm to the idea.