Tuesday 26 April 2016

AAA Asset - Returning and Adjustments


I got given the chance to return back to the triple a asset that we had constructed over the christmas period and there were some adjustments that needed to made. I found a new technique of creating color ID's, using turtle and the Lambert in Maya, which really did save me a lot of time. I then took the high poly and low poly into xNormal and that had it ready to bake.

Animating the gun to "bob"
The bake took a fair amount of time, so while that was taking place, I had a look at quixel, ready to place the materials that I wanted onto the model. Once it was baked, I then moved on and placed the low poly, along with the freshly baked AO map and the Normal map from the high poly. 

I gathered the textures and using the colour ID, created textures to map my gun look more unique, compared to the last one that I had constructed, which only had a base texture on it. The textures also looked a lot better as I had a while remapping it, getting it to look better.

Placing the gun as a Prefab
Once the maps were generated and I had the model, I opened Unity and created a prefab of the model. The model was then placed in the scene, along with the materials that I had constructed in Quixel. I decided that an animation would help finish off the scene, so I managed to animate the gun to bob up and down.

I was very much happy with the result that I got, It was a vast improvement upon the last project and again, I learned a lot just coming back to it and correcting my mistakes from the last time.

The Gun in Unity


Sunday 17 April 2016

Games Production - Creating Materials in Quixel


I created two separate materials that will go into the final project, these will be applied to some of the assets that I created to be scattered around the game. By creating these as their own materials, instead of applying it to just a Colour I.D map, then it saves us a few maps, which will work out better in the long term.

Red Plastic


Albedo Map.

Normal Map.

Specular Gloss Map.
This is a red scratched texture that I created. I was quite happy with the way that it turned out. This material would be applied to not only the button and base of the fire extinguisher, it will also be applied to the static trays that feature on the table.


Tarpooling 


Albedo Map.

Normal Map.

Specular Gloss Map.
This is aimed at one asset in particular, the tarpooling. It is literally the only material that we needed for it, as it is a direct reference from it. The normal map here does the majority of the work and gives us a fantastic result. When applied onto the assets, it looks like a real life image thanks to the texture that Quixel have created.

I also created a thick plastic texture, but I refuse to take any credit for it, as Ben Matthews, our other environment artist, had done the majority of the work, where as I only took this texture and altered it to fit my models. 

These materials will end up in the project, where they can easily be dragged onto an asset and then the material will do what it needs to do. I have used Quixel to generate the maps, from a list of pre-sets that they have provided, which was extremely helpful. If we had more tiem, I would create my own maps, using images and X-normal.

Games Production - Creating Sounds for The Game (Team Post)


We had all been introduced to the Sound room earlier on in the year. This really did interest us and make us want to use this for our game. So we all decided that we would book it and create sound affects for the game.
I created a list of Sayings for Ben.
The first priority was to get the voices of the enemy laid out. This would require the sound program "De-Humanizer". What this program does, is it records the sound of your voice and then it alters it by changing the pitch and adds effects on top of that. Reece Stansbury (Environment Artist) had created a list of sayings, in which we would recored and see if they work or not,

Our Voice Actor (Ben).
We all felt as a team, that Ben Matthews (Environment Artist) would suit the enemy's voice the best as he voice carried a deep pitch. It was quite an experience getting into the studio and recording real time sounds that would be present in our game.

Razvan Getting the Files Sorted.
Razvan Prajanu helped set up the files that the recordings were going to go. The idea is that when you save a recording from de-humanizer, it will save two version, one being the modified voice, which will go in game, the other being the normal recording.

Controlling and Navigating De-Humaniser.
The layout of De-Humanizer was fairly easy to understand. It gave us a list of pre-sets that we were able to modify through the use of the wheel to the right. In the end, the team decided that best modification to Ben's voice, would be the use of a demon, which worked extremely well.

Reece told Ben, through Ben's headset, when to say the sayings. This was so that there were no clippings in the sound and it was perfect, already, to go in game.

Our Game Designer (George) Looking Through the "General".
George Burchmore (Game Designer) and Ben Matthews used the "General" but had additional input from Razvan, Reece and Jay Pickett (Character Artist). It is a massive hard drive which is backed with thousands of sound affects. Many of these were perfect for the game. They also could be altered, so that when came to putting the sounds in the game, we could have some completely original ones that no one has used before. When searching through the "General" we made sure that our hard drives where full and we had plenty of sounds. Even if all of them were not going to get used, we all felt that we would rather have too much than too little.  


Games Production - Placing the Gun and Props into Unity


I had created the Gun in Maya and had textured in in Quixel. The next task was to get it put into Unity. As this was a key component in the game play, our Game Designer felt that it was best left to him, when it came to placing the gun, though he did show me the process in which he took, so that when it came to placing the smaller assets and attaching a texture to them, I would have no problem.

The Gun in Unity.
He had position the gun to where he wanted in the scene, this was after he had made the gun a prefab. This was needed to make the gun run at a decent pace and have no problems behind it.

Creating A Material and Placing it on the Gun.
He created a new material, in which he added in all the maps that I had baked. The shader needed to be a Specular set-up to include the Specular map. It was an extremely simple task, so I felt that when it was my time to put the materials on the assets, I had a great chance in succeeding.

Creating a Prefab for the Assets.
For the assets to go into the game smoothly, I would have to create a prefab for them, which also means that when they are pplace in the scene, on change to them will cause all of them to change. When coming to texturing, this is a good result, as I dont have apply the material to every single model.

I started off by creating an empty game object. Then in side the props folder, I created a new prefab. I then dragged this empty game object into the prefab, then the asset that I wanted the prefab of, I dragged it into the empty game object in the scene. Which location was set to 0,0, 0. This created the prefab of the model that we wanted.

The Assets in Unity.
I repeated the process in which George, our game designer had showed me, by creating a material on the prefab. I then located the maps which I had created in Quixel, and applied each map to their designated area. The maps had been colour I.D previously, so when it came to applying this same material to different object, we would get different results.

Applying the Map to the Assets.
I feel that in Unity, the assets are looking very nice, the only thing is now to see how they affect game play and whether they will still look nice after all the light maps have been baked. But as of so far, I am happy with the way that they have turned out. It was also an interesting way of taking this into Unity and still getting a good looking texture.


Games Production - Taking the Props into Quixel


As for the gun, the assets will have their own texture sheet, but as mentioned before, these maps would be a selection of assets and the same material will be applied to those assets, but hailing different results each time. This is a way of saving us texture sheets toward the final limitations of the game.

I first started off by creating the colour map, as mentioned several posts before. This was so Quixel could identify what material was going to be applied to certain parts of the asset. This again, was generated using the renderer "Turtle".  Once the scene has all been set Up in Quixel, all I had to do was right click and select the part of the mesh that I wanted to be textured.

The Maps
The Albedo Map.

The Normal Map.

The Specular Gloss Map.
Finished Props

After identifying the meshes using the Colour ID's, I ended up with some great result, the map and finished models tell. Here are a selection of all the props that I managed to create using a combination of Maya and Quixel. These are the final assets, which will be placed directly into our game.

The Wet Floor Sign.
This wet floor sign uses a dirty yellow plastic. I decided taht it would be best if I were to apply, on the Albedo map, a stick man slipping and a caution sign. This maps the sign feel more realistic and can do no harm to our game.

The Stool.

The Closed Folder.

The Documents.
Here I created text and a box which read "Private and Confidential". This was great in constructing a bit of atmosphere and backing up the fact that the facility that you are stationed in, is indeed a research and development facility. I again placed this onto the Albedo layer to place this onto the texture.

The Propane Tank.

The Propane Tank with Hazard.

The hazard sign was taken off of the internet, I made a few adjustments to the sign itself to get it to work well on the propane tank that I had made. I am fairly happy with the result and it works well with the other textures.

The Grenade.
Now that I had created all my maps, it was now time to take them into Unity and place them as materials. This meant that all the maps needed to be saved as Targas so they could apply. It was simply saving them as a .tga which gave me what I wanted. 

I was extremely happy with the way that these textures turned out and if they are a fraction of what they look like in Quixel then I would be happy with the end result.

Games Production - Taking the Gun into Quixel


For the gun to look good in Unity, I had to create an Ambient Occlusion map. It would find the location of the shadows and enhance them. It gives us an extremely detailed result. There are several ways to get the AO, I choose the mental ray Option.

I started off by selecting the object that I wanted to create an AO out of. I went into the hyper shader menu and selected the Surface Shader. The next step of the process was to create an Ambient Occlusion node which we will attach to the output of the Surface Shader. I had adjusted with the settings to give me the best possible result in generating an AO map. If you look below, you will see the final settings that we ended up with to achieve the result.
  
Adjusting the Shader's to create an Ambient Occlusion. 

Setting the Ray distance for full coverage.
All I had to now was to got onto the renderer tab in Maya. By clicking on "Lighting/Shading" you end up with a button which states "Batch Baking (mental ray)". I selected this tab and adjusted the setting accordingly (look above). By clicking on the bake option, the program would proceed to do so. This took some time to get the perfect AO map for our gun, but the end result was worth the trouble. This meant that it was now ready to take into Quixel.

The Maps


The Colour I.D Map.


The Ambient Occlusion Map.

The Specular Gloss Map.

The Normal Map.

The Albedo Map.
I am happy with the way that the maps had turned out. The use of the colour I.D map was extremely important when it came to texturing the gun. As you can see, there are a variety of textures to enhance the feel of the gun and make it seem more life like. This is the first thing that I have gotten to texture alone and the result was pleasing. 

Of course there are problems with some of the textures, such as the U.V's on some of the edges weren't done to the best of standards. But at least now I know, that when it comes to producing something else of this level, what to look out for.


The Gun with a Wood Grip.

Gun form another angle.
The Gun with a Metal Grip.

The Gun with a Metal Grip from another angle.
There were several different varieties of the gun that I came up with. In the end, I was stuck on these two different result. One with a wooden grip and one with a metal grip. As this asset was going to be in constant view of the player, it required a team meeting to decide what texture we were going to keep the grip. 

Overall I am happy with the result, as this is the first time, on my own, texturing an item. There are many aspects that I would like to change, if I had the time. One such problem is the weathering that the gun has on it. I would also next time like to use the DDO painter that is built into Quixel. It means that we could paint detail onto the model. Though again, I am happy with the result that I got in the end, especially with how much I learnt from the creation period all the way to texturing it and will definitely use this method of working the next time that I create an asset for a game.
 

Games Production - The Construction and Mapping of the Props


Again, I had to work with our Props Concept artist, who concepted many different assets to be scattered around and placed into our game. I also worked quite closely with our game designer, where we decided that there were going to be two types of assets. One being the Static Objects, the other being the Dynamic Objects. The static objects where assets that weren't going to move around during the game play. This was first priority, as the game designer needed to adjust them for the game. When the game was being baked, these still assets need to be present during the process. Cover points for the enemy have to also be added behind certain assets. Dynamic objects are different to there. The Dynamic assets have to be added in after the bake as the objects will move around and have physics behind them. These assets where smaller and more durable.

After having several concepts given to me and getting real life references myself, I started off with the construction of the static assets. These assets include a table, two types of crate, floodlights and a safe. These assets needed to be low poly as they were going to be scattered around the level. I managed to achieve relatively low poly assets. Me and the other Environment Artist, Ben Matthews, felt that the other room in our game needed to be filled. So we decided that I would create a tarpooling that will drape over the edge. This, itself, is still quite low poly. I would use a new process that I haven't tried before, the use of nCloth. This was combination of the physics and animation in Maya. The result was actually pleasing and really does add to the level.

Creating the Static Assets .
The next part of the process was to U.V map the assets. Many of these assets, such as the crates and the tables, were very square, so mapping them wasnt a hard task, it just required several cuts along the bottom and sides to fully map it. The difference was that as most of these were using the materials that had already been constructed by Ben (the other environment artist). This meant that the U.V's had to be scaled so that the materials would suit the assets and not look stretched.

Mapping the Static Assets.
The U.V have been adjusted to Suit Ben's Material.
Extracting the objects required the mesh to be separate. so that in Unity, the texture that had already been made by Ben, could be applied by to the assets. As you can see from the picture above, the U.V's have had to be scaled. This was a process that required me to take the asset into unity, apply the material to the assets and have a look at whether the U.V's needed to be extended. This crate that is pictured above didn't look good with the material on it, so I had to go back into Maya and then increase the size of the U.V's. As I was using materials that had already been constructed, The U.V's didn't need to be within the U.V range 0 to 1. So the U.V's here are much bigger than that.
The First Crate Type.
I decided that It would be best if I obtained so renders of the assets that were to go in game. This will help me and the Game Designer get a realisation of what the assets will look like in game. I tried a new process of rendering. This was something that I saw in a 3D Total magazine called "RenderMan". This was a process of rendering models in Maya that the famed animation company "Pixar" use. I applied a reflective metal and adjusted the settings of the crates. I also used an environmental light in the scene. I am extremely happy with the render and will continue to use this. 

The Second Crate Type.
I decided that to give us more variety in terms of cover. So I copied concepts that I had been given from our props artist. By having the two different varieties of crate, the player will have an unfamiliar environment. This crate has an unusual geometry, so narrowing down the edges of the crate was the biggest challenge. In this render I have used the same process as the other crate. This time though, I have used a plane as a floor and applied a reflective material onto it, this again, helps me and the game designer get a visual of what the assets will look like in game.
Health Pack/Safe.
At first, there where plans in which this object was going to be a health pack that the player picks up. We all had a team meeting and decided that it would make more sense if the health pick up would be the tubes on the enemies back. So we were left with this asset and felt that we would rather it not go to waste and still have a part to play in the game. That's when we felt that it would be best as a safe that would be placed on the tables to help fill the environment.
Health Pack/Safe.
I tried a new process of rendering, putting in clear glass. I'm not 100 percent certain whether or not we are going to continue with the glass. It would involve creating an inside for the safe. Also if it is a safe, we would want to present to the viewer what the people of this facility are hiding in the safe. We will apply a material the casing that will be different to the panel. This will separate the two sections.
 
Some of the Dynamic Props to feature in the Game.
We decided as a team that we were going to create objects that will be moving in the game. They will have physics behind them and certain objects, the player will be able to interact with. Again, I was working closely with the props artist Rastislav. He gave me a list of objects to construct, with some concepts. Others I had to make up or gain reference for. 

As the objects were going to use their own materials and maps, the idea was that I would have all the assets set up on the same texture sheet and apply the maps as a material to several different models. By using colour I.D's that I used in the gun, we can decided individually what model will have which material. This will save us on texture sheets, in which we are limited on.

I have split the assets into two different sections, "Assets_01" and "Assets_02". This means that each object has perfect sized materials and its easier to manage.

The Dynamic Props getting Mapped.
As you can see from the picture above I have managed to U.V unwrap the first set of dynamic assets. All the objects that I want to texture on the same map, then, like the gun, I press the "Layout" button so that all of the U.V's are on the same map and will not overlap each other. I have tried to keep the U.V's as neat as possible, so that when I come texturing the assets, there will be no stretch or distortion.

The Colour ID Map generated for the Dynamic Assets.
I tried a different process this time when it came to creating a Colour I.D map. Using the rendering process "Turtle", I applied coloured lambets to the objects that I wanted to have different materials on. Then I opened up the renderer to and converted it to bake an albedo map with the colours still attached to the U.V's. I then had all of the objects that I wanted on the texture sheet selected and then by simply rendered the current scene. This gave me a perfect colour ID map and saved me a lot of time, instead of having to go in manually like the process that I took with my gun.

Extra Dynamic Assets to go in Game (Mainly Transparent).

Not forgetting that I also had extra assets, these where also dynamic, but I felt that it would help the work flow to split the dynamic assets in half. As I had 20 assets in total, a 10/10 split felt necessary. Again, I copied the same process as before. These objects where more transparent than anything. Ben had already made a fantastic glass texture, but I felt it needed to thicker, I took the texture and modified to create my own thick plastic material. Ben had done the majority of the work of this material, I just copied it and turned up the specular gloss opacity, so that it would appear thicker on the texture. This suited the majority of the objects perfectly.

Extra Dynamic Assets being Mapped.
As you can see from the image above, the U.V's are laid out neatly, ready for the texturing process. As I had already created the material "Thick Plastic" the majority of it didn't need on this texture sheet. If I were to do it here, it would affect all the other materials, which is something that I dont want to happen. This was discovered after going through the mapping and Colour I.D process, so they appeared on these maps, but were not affected by the materials applied on it.

Colour I.D Maps for the Extra Assets.
I also used the same process that I used for the colour I.D map before. This was because it was a very easy and quick process and managed to save me a fair amount of time. The green parts of the I.D map are the meshes that were going to be transparent, so they will not be relevant to this map.

Propane Tank.
This is a propane tank that I decided to model. I was told by the game developer, that if we had time, it would be interesting to have a object explode if you shoot it. So I went away and looked up real life references for a propane tank. Using images I found on the internet, I managed to construct a decent model of a propane tank. It will be good to put this asset in scene, even if we dont get the chance to make them explode, as it will help fill up the scene.

Lab Goggles.
The goggle have two different materials applied to them, one being the transparent plastic that I had modified from Ben's glass texture earlier and the other one being a black fabric which would represent the strap of the goggles. This has an interesting shape to it, I used the Curve tool to create the strap, which game me decent representation. The goggles, I feel, was a decent model with not too many tries in it. As it was transparent, the inside of the goggles had to be modelled as well.

Scalpel.
This is an assets that I had made of a simple surgical scalpel. As this was a research and development facility, with the addition of the chunk of flesh that is located in the centre of the map, I felt that this asset suited the project perfectly. There will be a shiny metal texture that will be attached to it.

Scissors.
I created a set of scissors to feature in our game. The problem is that for something as small as this, it has far too many polys in it. I was trying to make a real life model and at the time didn't take any consideration on how it will affect the game. So If I were to create this again, I would at least aim to half the poly count. It will also use a shiny material.

Test Tube Lab.
This was a simple model to create, but again, perhaps there are too many polys for such a small object. As a research facility, there will be many of these spread around the map, so it may affect the game play, which is something we may wish to avoid. This will use that see through plastic material that I modified. It will also come in a pair with another assets that I made, which is a "Test Tube Rack".
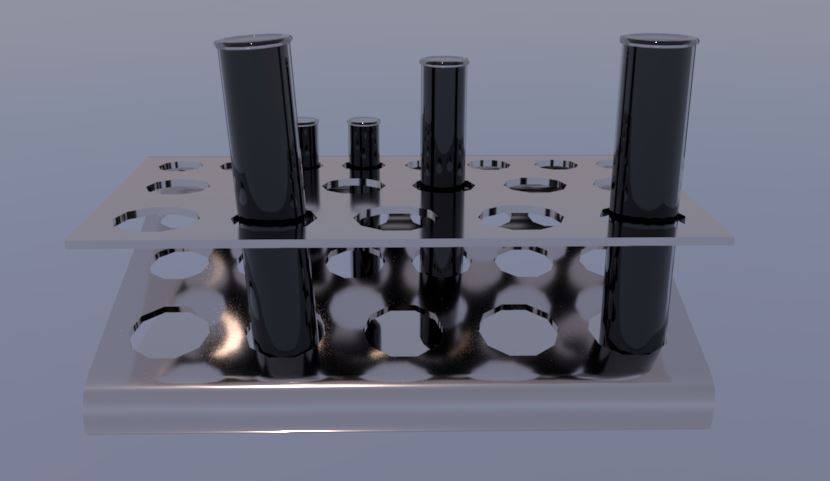
Test Tube Rack.
The reference that I used for this object was a school test tube rack. Obvious to its name, it will hold the test tube and display them. This was as low poly as I could get the rack, especially with the holes in the mesh. I used the same method that I previously used in the gun barrel, which gave me a great result. As you can see, the holes aren't a fully round circle, this is to save on the poly count, with the main effort behind these assets being dedicated to making them low poly, so it doesn't take many tris out of our maximum.
Wet Floor Sign.
In the concept that Razvan had created, he featured a wet floor sign, I felt that not only was this an easy asset to construct, but it was also more interesting to the scene. It has a fairly simple shape to it, with a traditional yellow plastic that will be applied to it. I will also go into the make and add text which reads "Wet Floor".

Fire Extinguisher.
The fire extinguisher was created off of a piece of concept art that was created by Rastislav. It was an interesting, more futuristic take on the fire extinguisher. So I followed the design closely and came up with a great result. This will be the basic textures that will be attached to it, Making it stand out on the grey shiny walls.

I was happy with the amount of assets that had been created, with them being scattered around the map. The next step of the process was to move on with the texturing process as all the assets had been mapped.

The tri count for all the assets in total, including the gun, numbers up to just under 70,00. This was great as it gave our other Environment artist (Ben Matthews) and Character artist (Jay Pickett) a decent amount to progress with their part of the work.