Friday 31 October 2014

Monsters Concept


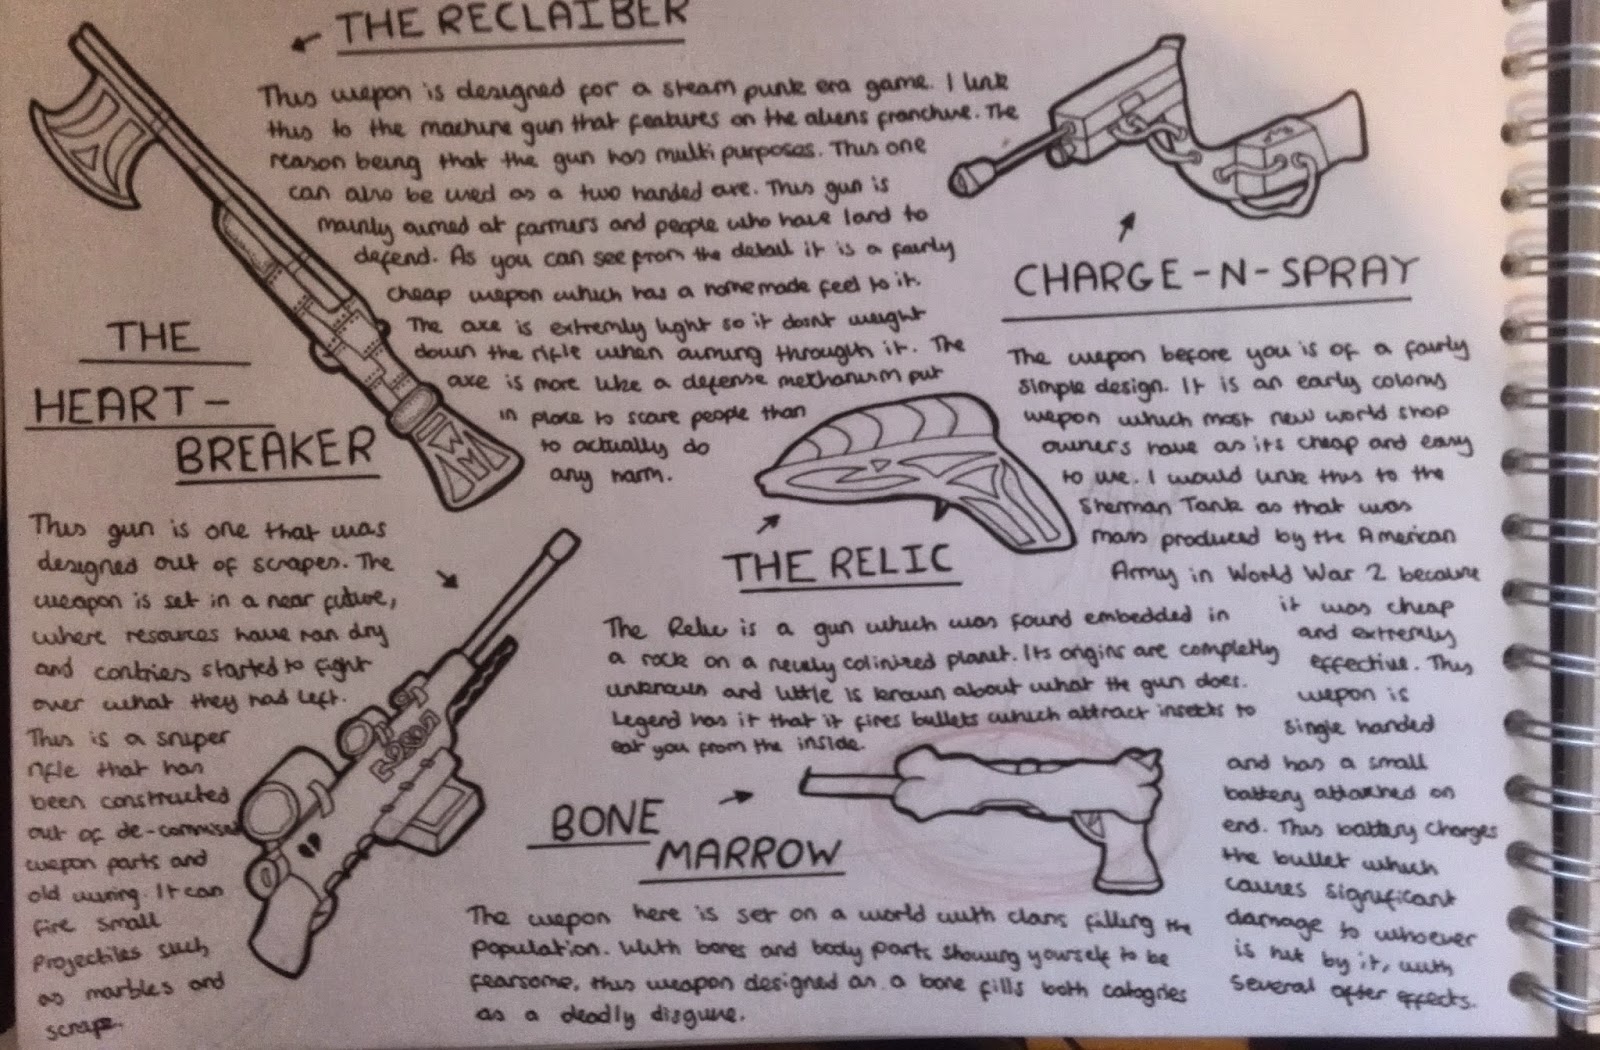
This weeks assignment was to create a monster in any fashion that we wanted. This was due to this week being Halloween. I was really looking forward to this task, another way for me to get my drawing skills up, even further.

I really liked the idea of a scary, dark, monster, something that used to freak me out when I was a kid was the the humanoid monster. Ones that had the body and average features of a human, but the face and/or voice of them would horrify me. One that particularly stood out was the female lead from the movie "The Exorcist".

"The Exorcist"
In the movie, this little girl gets possessed by a other worldly figure and starts to act strange. Next thing you know, she is climbing all over the walls and is cursing like a mad man. The mother of this child calls two priests who work their way through to the thing that has possessed her in an attempt to free her from within.

Just the picture above alone scares the hell out of me. Its like what I was explaining at the top, something so natural, yet defies the laws of physics is something that is terrifying. I think we, as a people, find this scary because, in our minds, we think that it actually could happen.

My monster mood board.
I started off the whole project by creating a mood board, This gave me helpful influence that I needed in creating my own nasty creature. Here I gathered many dark, twisted creatures that used to haunt my dreams as a child and stuck them onto a page to create a collage of nightmares.
The features of a monster.
I then decided to do a little bit of research, deciding what makes a scary monster. What I ended up doing was creating a mind map of features of a monster. This includes the height of a monster, the eyes, the environment and the normality (stuff that makes the creatures look like one of us.
Different types of monsters.
After this mind map, I wanted to create another mind map. Here I would look at the most famous monsters of all time. By looking at this I have found out what are the main features of a monster which makes them so recognizable. Also gives me inspiration to draw off of when I create my own monsters.
My favorite monsters part 1.

My favorite monsters part 2. 


The last piece of research that I decided to do was choose my favorite monsters in films and games. Though there were many classics to choose from I decided to go for the ones that truly scared me as a child. They are not ones that are well known, but ones that at the time, I truly felt fear.

I then went on to draw my rough ideas. These were quite interesting, as from a young age, had always had a fascination with the supernatural, I used to spend a lot of spare time drawing ghoals and such, so this was a way for me to relive that time.

Two  quick sketches of monsters.
If you select the picture, you can see the back story that I have created for all the monsters that I had created.

The other two sketches.
I then proceeded to create a final design based on my roughs. The way that I came up with this idea was actually quite different to what I'm used to. In the life drawing class that we had, we had the model pose in several different monster positions. One of these positions, he was sluggish, like he had given up, I'd really liked that pose. As soon as I got home, I scanned that picture in and opened it up on Photoshop.

By using a combination of several tones, I managed to achieve the ghostly colors that you see below. One thing that I wanted to do was make it seem as if you the viewer are  a character itself, that's why I made the sketch first person. I used the circle tool on Photoshop to create this flashlight effect, which adds realism to the piece.

My ghostly creature.
I was quite happy with what I had ended up with. In my opinion, if you were to see this creature running at you, you would not think twice about turning the other way round. I was proud of the life drawing that I had of him and incorporated into my piece. It just goes to show that my drawing skills are getting better doing life drawing and hopefully, that will continue.

The "Make Live" button on Maya


Today Robin gave us a tool in Maya that he said will greatly help us. This was called the "Make Live" button. What this does is that it creates objects on other objects faces. This saves a lot of hassle because we don't have to move  the objects into the right position as they are already there.

The brilliant thing about this tool, is that in my level that I am designing, I require a lot of time placing things on top of each other and so forth, so just by simply clicking on two buttons, the item can appear on the wall, almost instantly.

How to select the "Make Live" button.
On the picture above, I have selected the "Make Live" button by clicking on the modify bar at the top of the screen and choosing "Make Live". Its really as simple as that. The only thing about it is that you have to make sure that you have selected an object to put stuff on top of, otherwise, it will be ineffective.

The object appears on top of the shape.
Once the button has been clicked, you are now able to put objects on top of others. This is very useful, saving a lot of time when it comes to Maya. The other thing to remember is that to move the original object around you have to make it "Not Live" by doing the same process.

I took this process into my Star Wars Death Star Turret that I had made earlier and this is what I got.

2 out of 4 sides.

This was an extremely easy process to go through in Maya, it only took me several seconds to learn, and in my opinion, its one of the most important things that I have learnt so far on this course. The pictures above and below just go to show how easy it is to use it.

To cover the turret it took me a maximum of ten minutes, I can safely say that it is fairly detailed. If I were to really go for it and spend a fair amount of time doing this, I can honestly believe that I could create some wonderful things in Maya. 

Another 2 out of 4 sides.
My Maya skills are really coming along for only being in the course for a couple of weeks. I'm actually having a lot of fun with it and see it more as world building game like Minecraft, than an actual program set for designing game details. I think by playing Video Games, its given me a creative mind and I have a basic concept from this as to what a game world should look and feel like.

Texturing a Zombie


Today we had a rather fun activity (not that they all aren't fun) and create a walking zombie in Unity, designed by ourselves, just to get us into the Halloween spirit for this week.

We first started off with a texture map of this woman. Its like she had been folded out of her skin and clothes, they were just lying there, on a square, colored in and ready to use for on a model.

The skin and clothes being pulled apart.
The original woman walking about on Maya.
As you can see, this freaky piece is what we were given. We were then told that using a variety of different methods, we can change her clothes and the colors of them. So that's what we did. Using my fairly wide knowledge of Photoshop, I set about changing the color of her jumper.

We were then instructed to go onto the internet and find a well lit face. We would use what we had learnt to place an image straight over the one that we already had.

Not finished here, we had to then make this woman seem like a zombie. Using different skills that we had learnt the past couple of weeks, I had decided to make her skin grey, like the blood had been sucked out, I also gave her grey eyes, with no color and blood splatters all over here jacket. Another feature that I had created was the blood on the face, such as scratches and nose bleeds.


"Zombie girl"
The zombie girl walking around on Maya.
I really did enjoy this project and had a lot of fun. It was good to see that the skills that I had learnt in the course are starting to settle in. If I had a lot more time in the lesson, I would go about, using the same technique that I had used for the face and create cracked skin and more blood gushing out. I will say though that I am most proud of the way that the face has turned out and how it has merged with its new body almost perfectly. It feels like I am advancing more and I have to keep this up.

Life Drawing - Lesson 4


For this drawing, we had to use the side of the charcoal to draw the body, this was difficult.

Again using the side of a charcoal, we drew at the moment.


(Apologizes if the picture is upside down) here we had to complete color the page with charcoal, the using a rubber, had to rub out what we had saw.

Thursday 30 October 2014

Perspective Drawing


We were set a task by Steve over the week to follow a couple of tutorials of how to draw perspective. The first one was of a room using one point perspective. I had never gotten close to perspective but was actually really looking forward to getting to grips with it.

This tutorial was actually pretty easy to follow, the person who was teaching us was fairly slow. Everything that he said to us seemed to make sense. Me, myself, found this tutorial to be fun. We started off at a single point. The point is located at the bottom right of the second picture frame. From that one point, we drew everything that you see. These includes the door frames, the table and the floor boards.

I do think that this is one of the best drawings I've done in a while, which doesn't say much really. I also managed to complete this drawing in such a short amount of time (15 minutes). If I were to spend more time on the first picture, I would add a lot more detail to it. Different plans that I had lined out for this include different colors for the rugs, background art and pictures in the frames.

My room drawing.
This is the second tutorial that we were told to do was copy a YouTube tutorial by Mark Crilley. It was him quickly sketching a one point perspective piece of his graphic novel. I actually found this one extremely difficult to follow. Mark was very quick at sketching his masterpiece, he would draw several lines and I would follow exactly, then would look at his work, then mine, then they would look completely difficult. It really started to frustrate me.

There were many times throughout this task were I had to improvise. This was because Mark had skipped ahead so I had to end up filling the blanks.
"Lost world" drawing.
Now that it is finished, it is very impressive. The only problem that I have with it is that, to me, it looks too messy, no way near as good as the final product. I suppose this is a way to get me learning, to find the faults in my work and find act upon them appropriately.

Saturday 25 October 2014

Life Drawing - Lesson 3


We started off by doing two sketches, they had to focusing on certain different areas. here I've focused on the belly, and the left side of the body.

Here, we again, had to focus on different parts, this time though, using different media.

(Apologizes if upside down) We had to draw two different portraits, which came out quite nicely.

Coding a Lightswitch


We first came into the lesson to be told that we had to open a document up in-titled "Light switch". We were completely unaware of what we were going to do at this stage, that was until Ewan sat us down and told us we were going to make a light switch turn off and on.

This was the area of Computer Games Arts that I was trying to avoid. I had no idea how this worked but was keen to start learning. We had to open up Unity and get to this page:

Basic script for turning a light on and off.

As you can see from the image, it is very complicated. I'm still trying to understand how by putting in a bunch of words into a computer, that programs a light switch to turn off and on. We created a box around the light switch which meant that if the character in the game was to enter the box, then they could turn the switch on, otherwise they could be across the map and turn it on.

I think that this task was extremely difficult, but I am willing to learn how to do it. Although it was really hard, I think it was a great skill to learn, I think that if I focus my efforts towards Unity a little bit more then I could end up with a great end result.


The reason why the button will not turn in the video after I had walked away from the switch was because the switch had a box surrounding it. I had coded it in the lesson, so if you enter the box, it will allow you to turn the light on, this means that you cant turn the switch on from the other side of the map.

Monday 20 October 2014

Futuristic Weapons Concept


As a homework assignment for Steve, we had to go away and create a piece of concept art. We would have to go away and research futuristic weapons, create a mood board, come up with several designs, then take our final one into Photoshop and touch it up.

I was quite excited for this task as I do spend a lot of my spare time drawing weapons. Its become an odd hobby of mine which I enjoy. I already had several ideas but first I had to come up with a mood board.

My mood board.
As you can see, in this department I am heavily inspired by movies. Several that appear there are Phasers from Star Trek, Blasters from Star Wars and the machine gun from Avatar. I think a collected a good amount of weapons. I also wanted to get as many different types/appearances of guns as possible, which again, I feel I filled this criteria.

Future GUNS mind map.
I then went on to create a mind map looking into common guns that were found in video games and in movies. By having them all lined up together I could see what common element that they had and what made these ones unique to others.

What makes a good Sci Fi weapon?
As I was researching into common future arms feats, I came across a page on the internet which counted down on the top ten weapons from Sci Fi movies. This was exactly what I needed, It helped showed me what fans of the genre appreciated the most about these classic pieces of weaponry. 

I stuck segments of this into my book and started to pull apart what the text was telling me, like what made these weapons so great in the first place.


Favorite weapons part 1.

Favorite weapons part 2.
As you can see from above, the next stage that I went to was to choose my favorite weapons from sci fi and real time and decide what parts of the gun are required and what makes a gun unique. I came up with many different results in which all of them are located in my sketch book.

Design page 1.
Design page 2.
I did go a bit full blown when it came to designing the weapons. This was because I really did enjoy drawing and coming up with the different ideas. It also gave me more variety when it came to putting my piece in Photoshop, I had more of a choice.

In the end I decided to take "Bone Marrow" into Photoshop to give it a lick of paint and to make it look more realistic.
My "Bone Marrow".

Different presentation.
This was my final design. In the end I was extremely happy with how it turned out. I put the skills that I had learned recently in Photoshop and put them to good use.

Tuesday 14 October 2014

Textures on Maya


Today's lesson involved the Star Wars Death Star turret that we made last week. We were going to add texture to it. This was a thing that I was eager to learn as I wanted to continue my progression on Maya. I did find this whole session to be rather difficult as I ended up asking our teacher Robin for help many times.

The turret has been covered.
What we had to do was to cover the base with this checkered pattern. I found this a struggle as we had to find all the different locations of the buttons that make this work. We first had to create a U.V map. Once this was done, we then had to drag the different faces of the base out of the grid that was located in.

This is what the U.V texture editor looks like.
Then from here we would cover the faces in a new material. This was simple enough to do as I had done this before on the fish project. We would use the checked pattern and make sure that this was all the same size.

Robin then proceeded to tell us next lesson, we will be working more on this. As mentioned before, I really did find this an uphill struggle, but in the end I actually did enjoy it. I'm starting to feel quite at home with Maya. Not that I have made a decision into what my future holds already, its just at the moment, im getting on better with this than I am with other parts of this course.


Silhouettes in Photoshop


We had another lesson in 2D art. Today we were told that we were going to discover a new way to paint models in Photoshop. We were going to draw the silhouettes first then we will be filling in the detail later. This was an interesting transaction for me as I hadn't been doing digital drawing for long and am still searching for a style of my own.

We watched a video which was taught by a professional artist in Singapore. He showed us the ways of the silhouettes and how to shade it. So  we were given the task by Steve to create a Crustacean based monster. 3 of them, completely shaded with a touch of color to them.

An earlier version.
I found this task very difficult, the shape of the creature, I could come up with, no problem, its just the shading that really got me. I attempted several times to get the shading right on these characters and it just wasn't working.

My "final".
I prefer the way that I done it in the earlier version, as the characters look more realistic and believable, its just I needed to have something complete so I completely rushed this. The three silhouettes at the start took me ten minutes to complete.

I was extremely disappointed with the result that I got, but it is a learning curve for me. I know that if I'm going to do something, I need to put my heart and soul into it, because if I don't, whats the point in trying, all I'm going to end up with will be the results that you see before you. Pictures that have bought my confidence in digital drawing down by a large amount.

I hope eventually I could come back to this project and safely say "How did I do so terrible? Thats really easy to do?".


Tools in Maya


We were given a task from Robin to compete several activities that were ready for us to start on Lynda.com. I remember back a few weeks ago we were given another task on Lynda.com to create a fish. I was very happy with what I ended up with so I'm looking forward to having this again.

To be honest, straight from the get go I found this task a lot easier to do than the fish. The guy that was presenting the lesson was a lot more clearer than the previous person. He seemed more laid back, like he was willing to stop for us to learn. We started off by creating the hammer.

This hammer was unbelievably easy, I was actually shocked with how quick it came out. The realism of the finished hammer as well was something that surprised me dearly. I then went onto the pipe, this as well, along with the direction of the tutor, made a very realistic looking pipe. I followed the tutorial exactly how they had showed us, but there was one massive problem, there was a side which was not shown in the tutorial, leaving the student to solve the problem. I tried my hardest but a lot of that was improvised and I wasn't too happy with the final result. The straight part of the pry bar wasnt good enough in my opinion and needs some follow up work on it.

My finished hammer.
The pry-bar was a lot harder than the hammer. I followed the tutorial, exactly everything was told and up to that point it went well. That was until we had to use the tutorial to replicate the edge on the other side. For some reason, every time I attempted to extrude that face, the edges were apart. This was even after "keep faces together" had been selected. After many different attempts at improvisations, I felt that I needed help, without the tutorial, so I decided to pack it in for the night.
The pry-bar.


Monday 13 October 2014

One Sheet for Game


I mentioned in one of my earlier posts "Submerged" about the idea of a one sheet. Well we had to make a one sheet for a game that we were actually going to make. We were told by Ewan a while back that we were going to be making a game with at least two minutes of game play. This meant that if we made a one sheet it would give a team a rough estimate of what the game I going to be and what it is going to consist of.

My game was going to start off as your character waking up in bed to discover that his wife and child are missing. While searching the house you see signs of a struggle, so your character goes over to the house opposite and the same thing happens there. You decide to follow the trail of destruction which leads you to a local fair ground. While searching the fair ground, you have to solve a variety of puzzles all the while gaining information as to whats in the tents. Then while skulking about, you overhear two of the circus acts talking of sacrificing your friend and family, you have to navigate your way through there and end up freeing everyone from their satanic cult.

My One Sheet.
Over the next week I had a think about if I really wanted to continue with this idea, I liked the concept behind it, the interesting story and so on, but for the winter project, we have to actually have this handed in. I don't think that I will be able to construct the house, let alone the details on the inside. I decided it was best if I made the concept a bit more simple and started a new idea.

In the end I had a vision of a game were you, the character have to escape this facility. The good thing about doing this is that most things in places like factories are similar, so for pipes for example, all I have to do is replicate them and charge the size, the I'm done.

I'm going to stick to the idea of you being a mechanic, working in a factory. while all the way on the other side, attempting to hear a problem with the heating system, the place starts to shake. The lights on the walls start to pop and the pipes on the walls end up releasing steam. The aim of the game is to get out of the facility. I haven't quite decided yet if I will include a timer, but if I do, I want the environment to play some part in that.

Life Drawing - Lesson 2


I was really looking forward to our next Life Drawing Session. I knew that this time it was going to be even better as we had an extra hours time. Also the was a new model to draw. As soon as we entered the room, there was a buzz of excitement about, who were were going to draw today. A rounder model had taken his place in the center of the room. This was brilliant, as students of Computer Games Arts we need to learn to draw all forms of the body and I think this fits the bill perfectly.

Today was really about different and creative ways that we can draw the model, e.g single line, wrong handed, etc. I managed to get myself in the same position as last time and sketched away.

Right hand 1.

Right hand 2.

We started off by doing some quick 5 minute sketches of the male model, this was just to warm us up. At first I started off with some fairly small drawings, managing to get 3 to the page,  after that I wanted to see my larger drawing skills to see if I would get the proportion right. I think, especially on A2 pieces of paper, this was my area and managed to get the out line of the models body onto the paper fairly well.

Single line 3.
Single line 1.
Single line 2.
Single line 4.


We did many different sketches by experimenting by using only a single line. This meant that start with one line and with it, we had to craft some sort of image out of it. by looking at the various results, I did get some mixed images. I really do like the way that the model came out on the third picture, especially the second one along. I feel the pose there is copied remarkable well. Whereas I'm fairly unhappy with drawing 2 as not only did I not get the chance to complete him, the body isn't in proportion.
         
Left Handed 1.             
Left handed 2.
Left handed 3.

I was very worried about this task as I know, from personal experience, that I am a terrible left handed drawer. So I tried to keep a perfect hand and for some, was actually really impressed with how some of my drawings turned out. others, though, I wasn't as impressed with. This is just how practise is coming along and I know that if I keep trying, I will end up with a fantastic result.